Mastering Attic and Crawl Space Insulation from Top to Bottom
Why Attic and Crawl Space Insulation Work Best Together
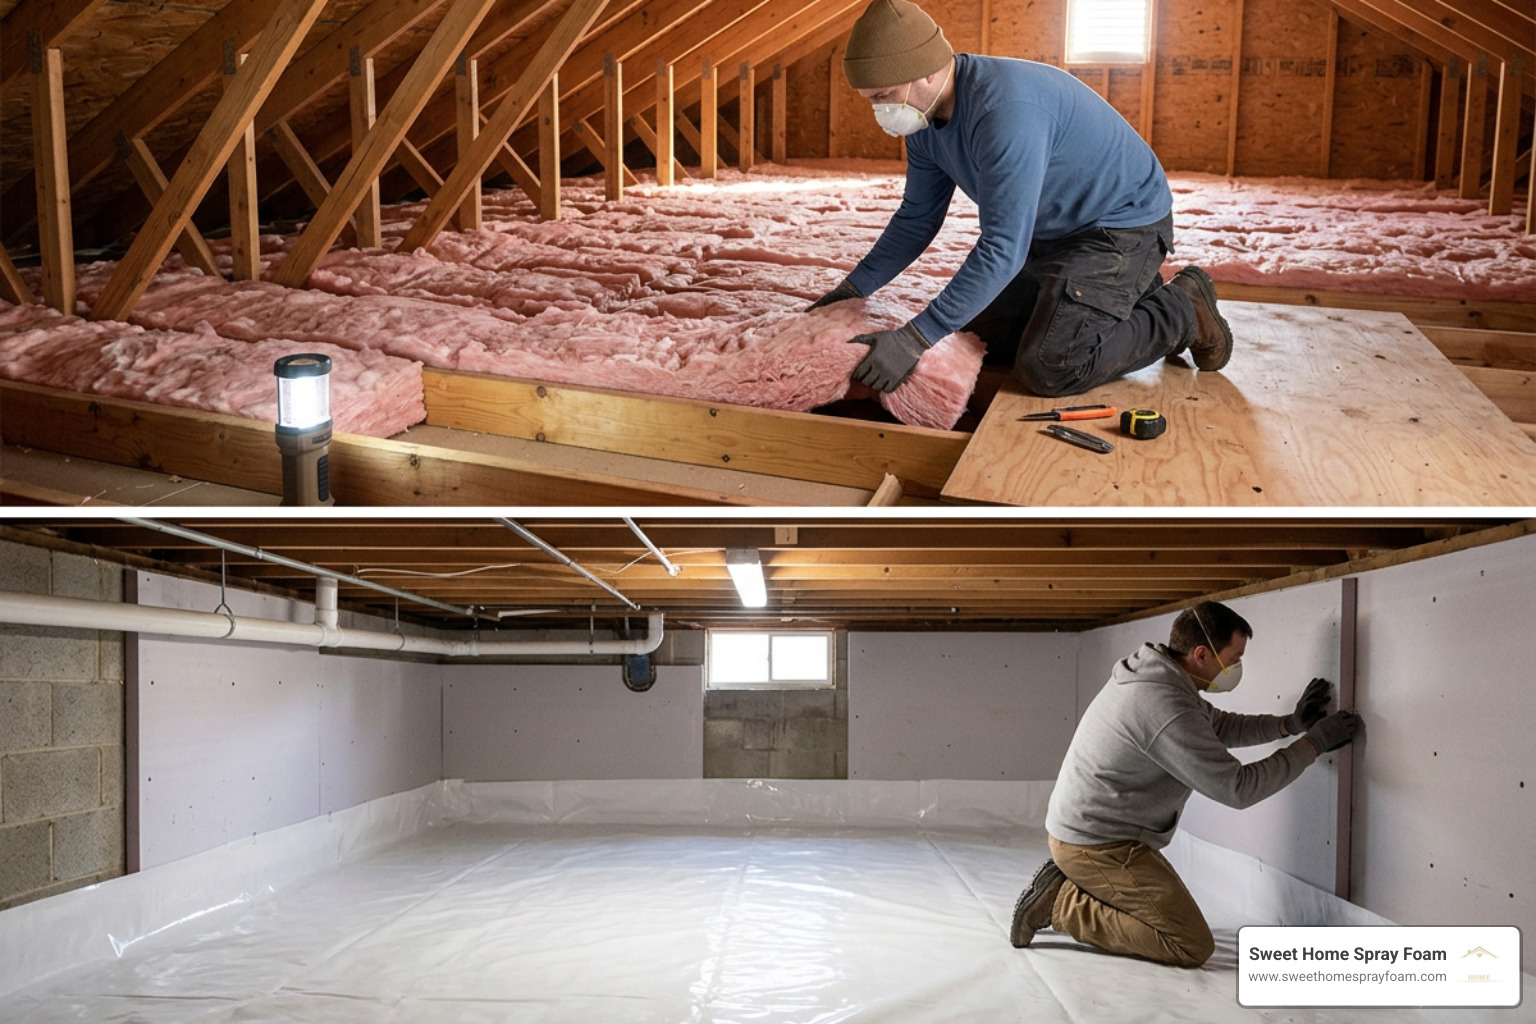
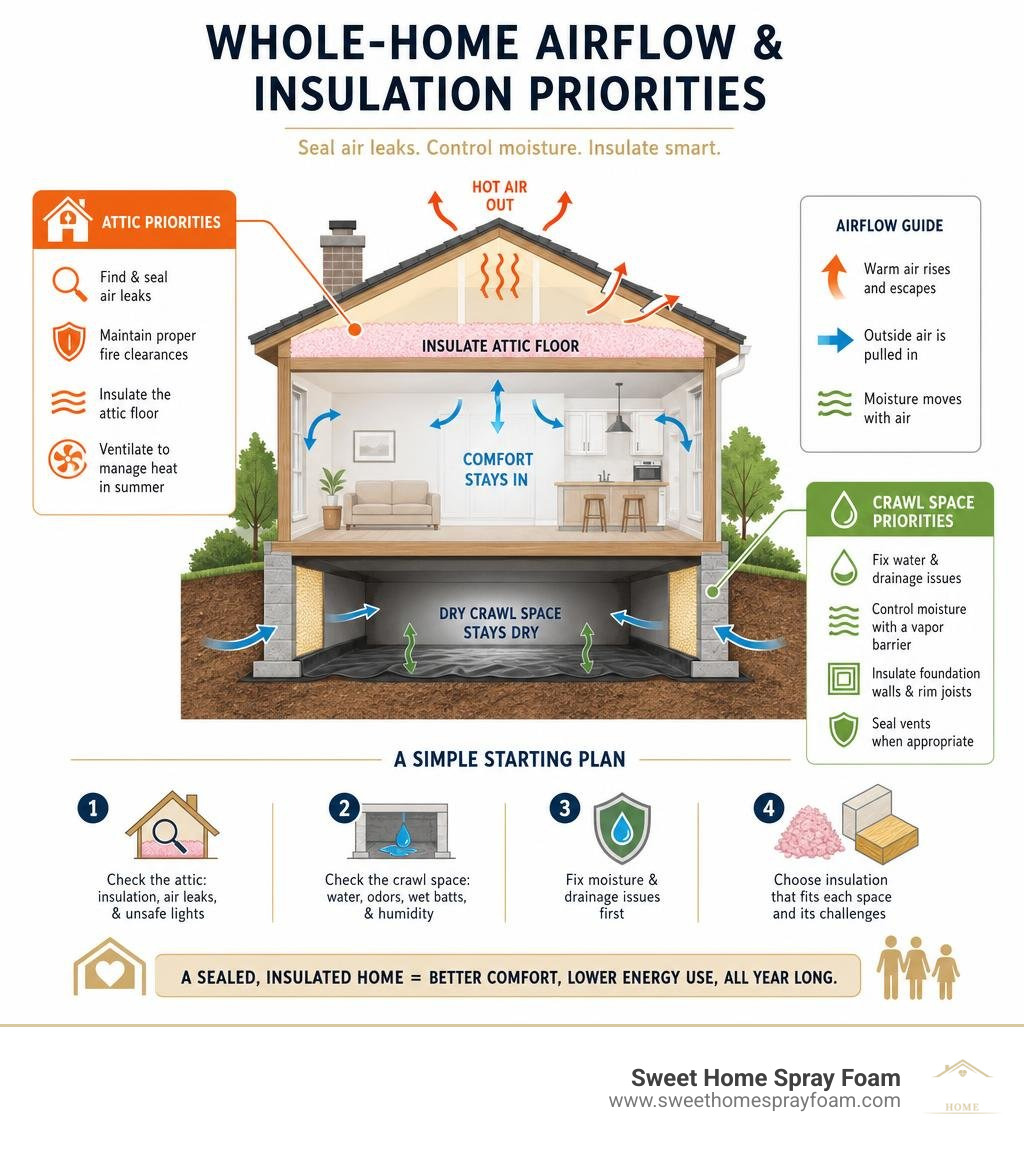
For better comfort and lower energy use, air-seal first, then insulate the attic floor and crawl space based on how each space handles heat and moisture. In most Virginia homes, attic insulation should slow heat loss and heat gain at the ceiling level, while a damp or sealed crawl space often needs a ground vapor barrier plus insulation on foundation walls and rim joists.
A simple starting plan:
- Check the attic for thin, uneven insulation, air leaks, and unsafe recessed lights.
- Check the crawl space for standing water, musty odors, wet or sagging batts, and high humidity.
- Fix drainage and moisture problems before insulating a crawl space.
- Choose insulation to match the space: blown-in material or spray foam for many attics; rigid foam or closed-cell spray foam for many sealed crawl spaces.
Your attic and crawl space sit at opposite ends of the home's thermal envelope, but both affect bills, drafts, and indoor comfort. The attic fights extreme roof heat and winter heat loss. The crawl space must also control ground moisture and humid outdoor air that can move up through the floors.
Done correctly, attic and crawl space insulation can reduce HVAC strain, help even out room temperatures, and make floors feel less cold. The details matter: attic air sealing and fire clearances are essential, while crawl space insulation must be paired with moisture control.
Understanding Attic and Crawl Space Insulation: Purpose, Building Science, and R-Values
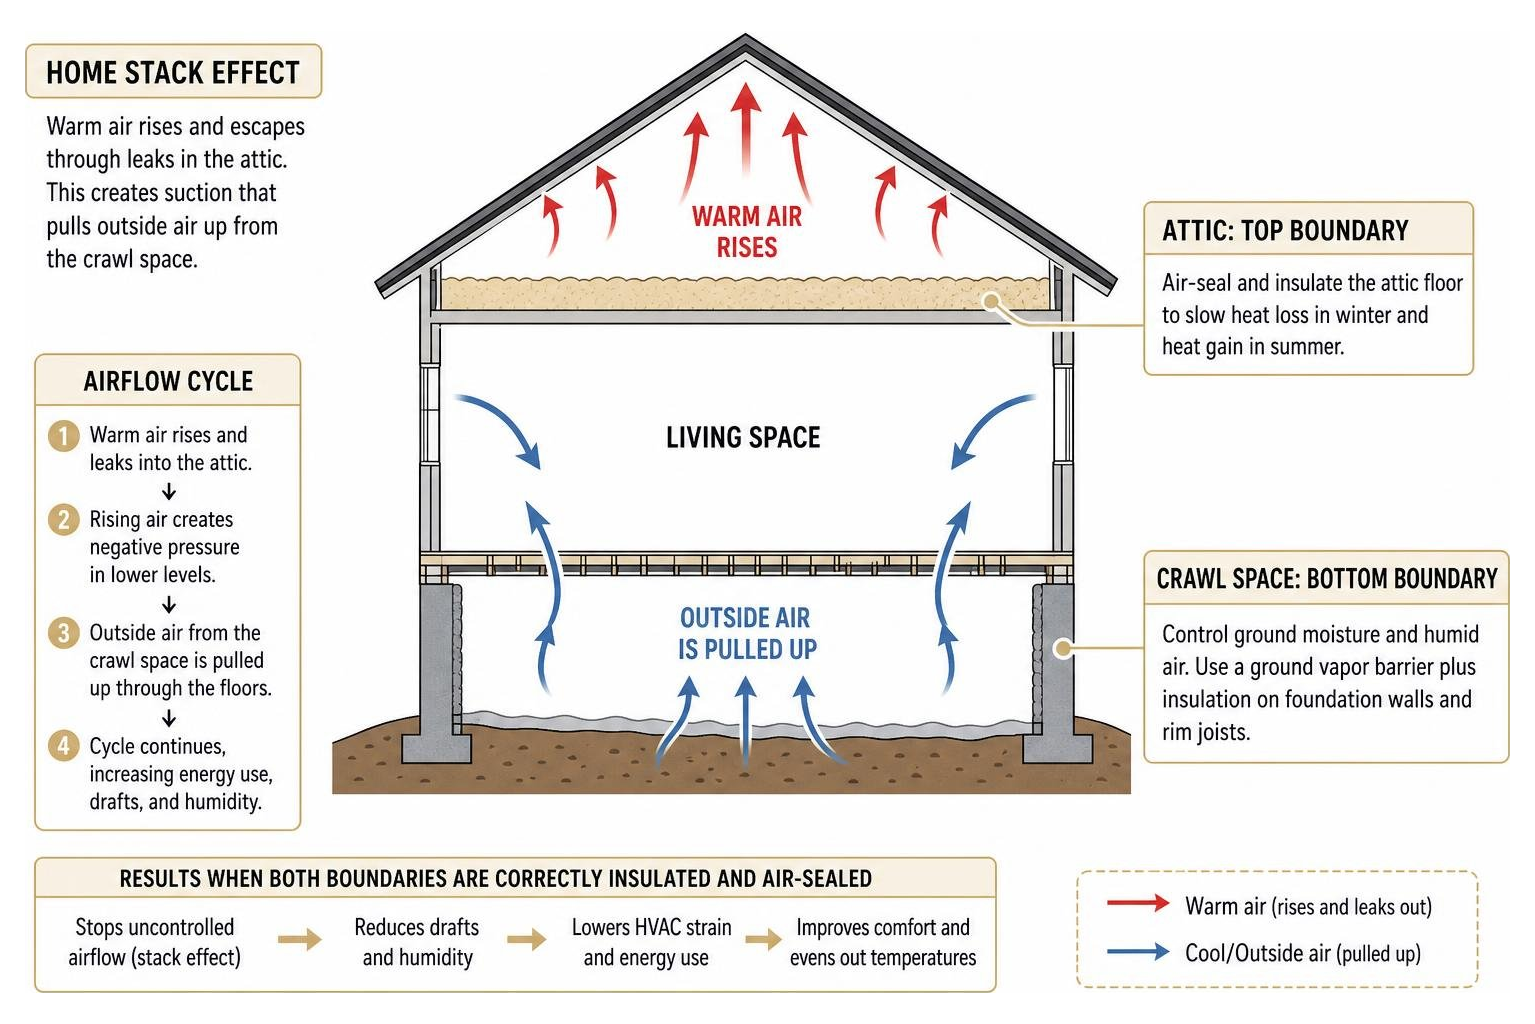
To understand why homes feel drafty in January or stuffy in July, we have to look at building science. Your home functions as a dynamic system governed by heat flow, air movement, and vapor diffusion. Heat always moves from warmer areas to colder areas through conduction, convection, and radiation. In the summer, an unconditioned attic can climb past 140°F, radiating intense thermal energy downward into your living quarters. In the winter, the reverse occurs: heated air inside your living areas rises, escaping into the attic while pulling frigid air into the lower levels of your home.
This vertical air movement is known as the stack effect. Think of your home like a chimney. When warm air rises and escapes through cracks in the ceiling, electrical fixtures, and plumbing chases into the attic, it creates negative pressure on the lower levels. That suction draws outdoor air, dirt, and moisture directly out of your crawl space and up through your floorboards. Addressing both boundaries together establishes a continuous thermal boundary that stops this uncontrolled airflow.
Why Both Boundaries Matter in the Thermal Envelope
Treating only one end of the home leaves the thermal envelope incomplete. If you heavily insulate your attic floor but leave an open, damp crawl space underneath, the stack effect continues to pull unconditioned ground air into your living spaces. In fact, building science reveals that up to half of your first-floor air rises directly from the crawl space.
When cold, humid crawl space air enters your home, it forces your heating and cooling equipment to work overtime. Stabilizing both the upper and lower boundaries stops convective currents, regulates interior humidity, and dramatically eases mechanical strain on HVAC systems. Homeowners interested in the physics behind whole-home performance can explore our in-depth insulation education resources to see how thermal boundaries protect structural integrity.
R-Value Standards: Climate Zones and Energy Efficiency
R-value measures an insulation material's thermal resistance—its ability to resist heat flow. The higher the R-value per inch of thickness, the greater the insulating power. The U.S. Department of Energy (DOE) establishes recommended R-values tailored to specific climate regions across the United States.
In moderate-to-cold regions (such as International Energy Conservation Code [IECC] Zones 3, 4, and 5 covering Virginia and neighboring states), attic insulation targets typically range from R-38 to R-60. For crawl space foundation walls, standard requirements generally call for continuous insulation ranging between R-10 and R-15, or R-19 to R-30 if insulating between the floor joists over a vented foundation.
| Climate Zone | Attic Target R-Value | Crawl Space Wall R-Value (Unvented) | Crawl Space Floor Joist R-Value (Vented) |
|---|---|---|---|
| Zone 1–2 (Hot/Warm) | R-30 to R-49 | R-5 to R-10 | R-13 to R-19 |
| Zone 3–4 (Moderate/Mixed) | R-38 to R-60 | R-10 to R-13 | R-19 to R-25 |
| Zone 5–8 (Cold/Very Cold) | R-49 to R-60 | R-15 to R-20 | R-30 |
Targeting the proper R-value ensures that seasonal heat flux is blunted before it penetrates interior living spaces.
Step-by-Step Guide to Installing Attic Insulation Safely
Upgrading an attic involves much more than simply rolling out fiberglass batts or spraying loose fill across the joists. A quality installation requires meticulous safety checks, thorough air sealing, and clear pathways for airflow.

Critical Safety Clearances and IC-Rated Recessed Lighting
Before adding an inch of insulation to an attic floor, you must identify potential fire hazards. Recessed ceiling light fixtures (canister lights) pose one of the most significant risks:
- Identify Fixture Ratings: Inspect the housing of every can light in the ceiling. Fixtures stamped "IC-Rated" (Insulation Contact) feature internal thermal switches and insulated housings that allow insulation to be placed directly against and over the fixture.
- Handle Non-IC Fixtures: If fixtures are marked "Non-IC," insulation must maintain a strict minimum clearance of three inches on all sides to allow heat dissipation. Covering a non-IC fixture with insulation can trap heat, degrade wiring, and trigger a structural fire. Alternatively, non-IC fixtures can be replaced with modern airtight, IC-rated LED retrofits or protected with fire-resistant rigid covers that maintain the 3-inch air gap.
- Chimney and Flue Clearances: Maintain a 2-inch clearance around masonry chimneys and metal exhaust flues using non-combustible sheet metal dams sealed with high-temperature firestop silicone.
- Electrical Junction Boxes: Ensure all electrical junction boxes have secure covers and extend junction box sides above the intended insulation depth so they remain visible and accessible.
Air Sealing, Attic Fans, and Ventilation Best Practices
Insulation slows conductive heat transfer, but it does not stop air leaks. Gaps around drywall top plates, plumbing stacks, drop soffits, and electrical wire penetrations create thermal bypasses that reduce the effective R-value of fluffy insulation by 30% to 50%.
Begin by sealing all attic floor bypasses with expandable polyurethane foam or elastomeric sealant. When maintaining a traditional unconditioned attic floor, install cardboard or rigid foam rafter baffles (vent chutes) at every soffit intake bay. These baffles preserve a 1-inch minimum clear path between the roof sheathing and the insulation, preventing blown material from blocking critical outdoor air circulation.
For unconditioned attics, attic exhaust fans can complement balanced soffit-to-ridge passive ventilation by lowering extreme summer heat buildup, reducing attic moisture, and lessening air conditioning runtimes. If you prefer to eliminate attic ventilation issues entirely while bringing ductwork inside conditioned space, applying high-performance attic spray foam insulation directly to the underside of the roof deck seals the envelope in one continuous step.
How to Properly Insulate and Encapsulate a Crawl Space
Traditional building codes historically called for exterior wall vents to flush moisture out of crawl spaces. Decades of building science research have proven that in humid climates, exterior vents do the exact opposite: they pull hot, moisture-laden summer air into a cool underground space, driving relative humidity over 70% and triggering mold growth, wood decay, and wet subfloors.
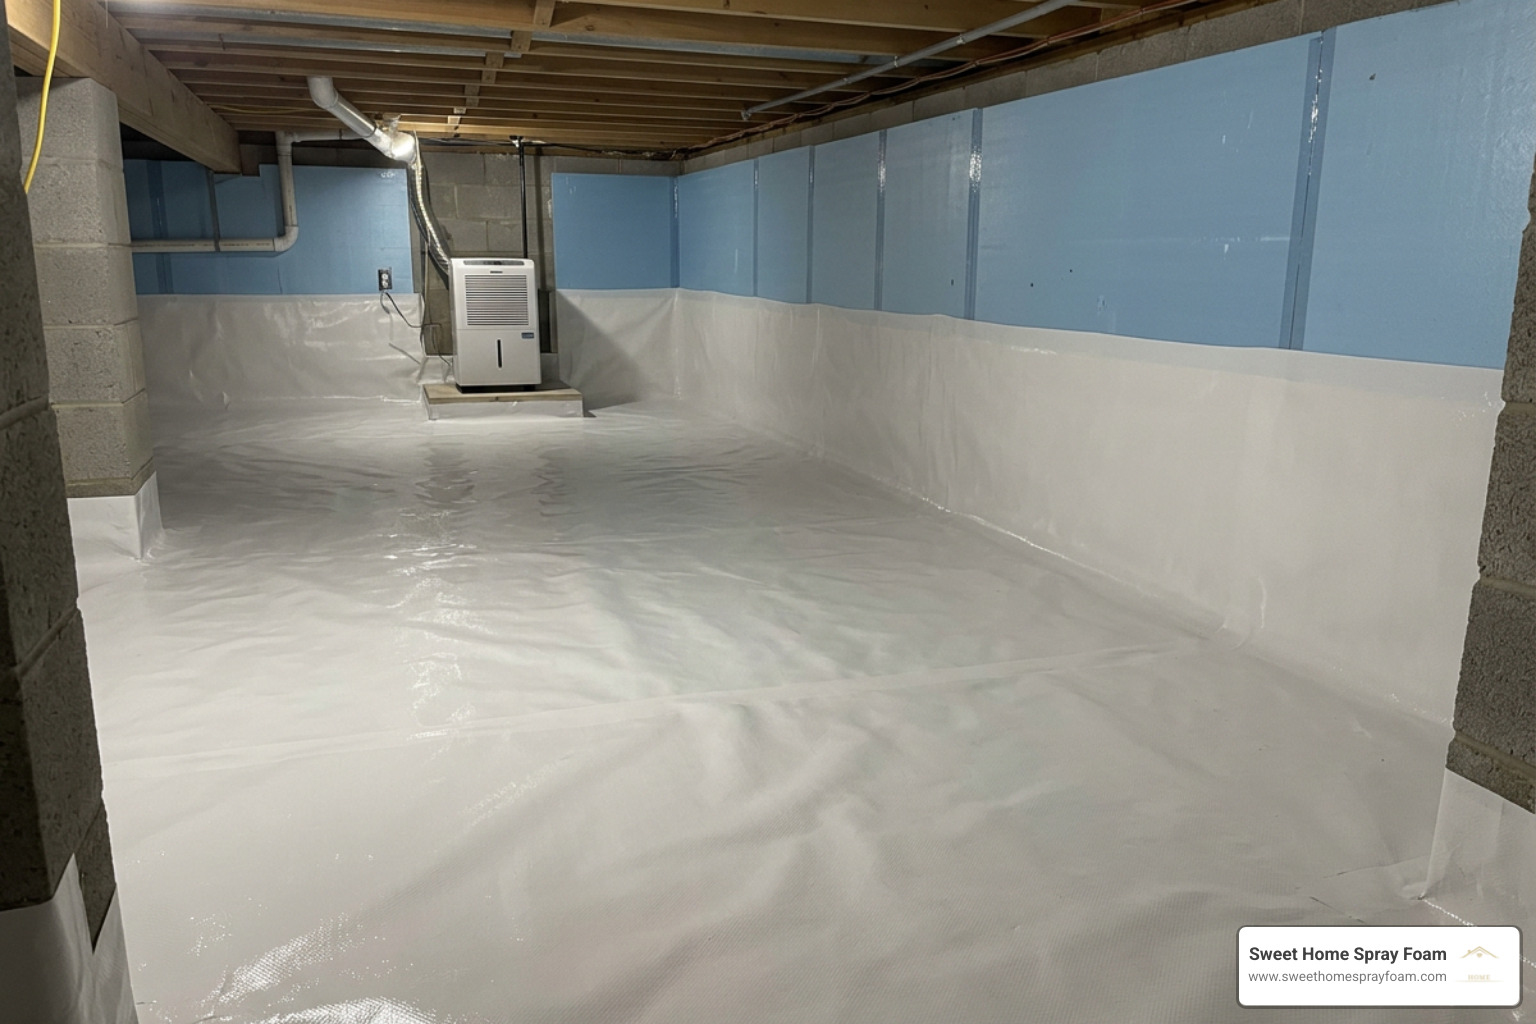
Vented vs. Sealed: Choosing the Right Attic and Crawl Space Insulation Strategy
When weighing vented versus sealed configurations, the unvented, encapsulated approach offers clear performance advantages. In a vented system, fiberglass batts are stuffed between subfloor joists. Over time, high humidity causes the glass fibers to absorb moisture, gain weight, compress, and pull away from the subfloor. This creates convective air channels that allow cold air to wash across the underside of the floorboards.
In contrast, converting the area into a sealed, conditioned space moves the thermal boundary from the floor joists to the foundation walls. According to Advanced Energy's landmark field studies, sealed crawl spaces maintain an average relative humidity of 52%, compared to 77% in vented crawl spaces. For detailed architectural guidelines on these configurations, consult the Building Science guidelines on crawl space insulation for durable, climate-specific envelope assemblies.
Installing Rigid Foam Board and Spray Foam on Foundation Walls
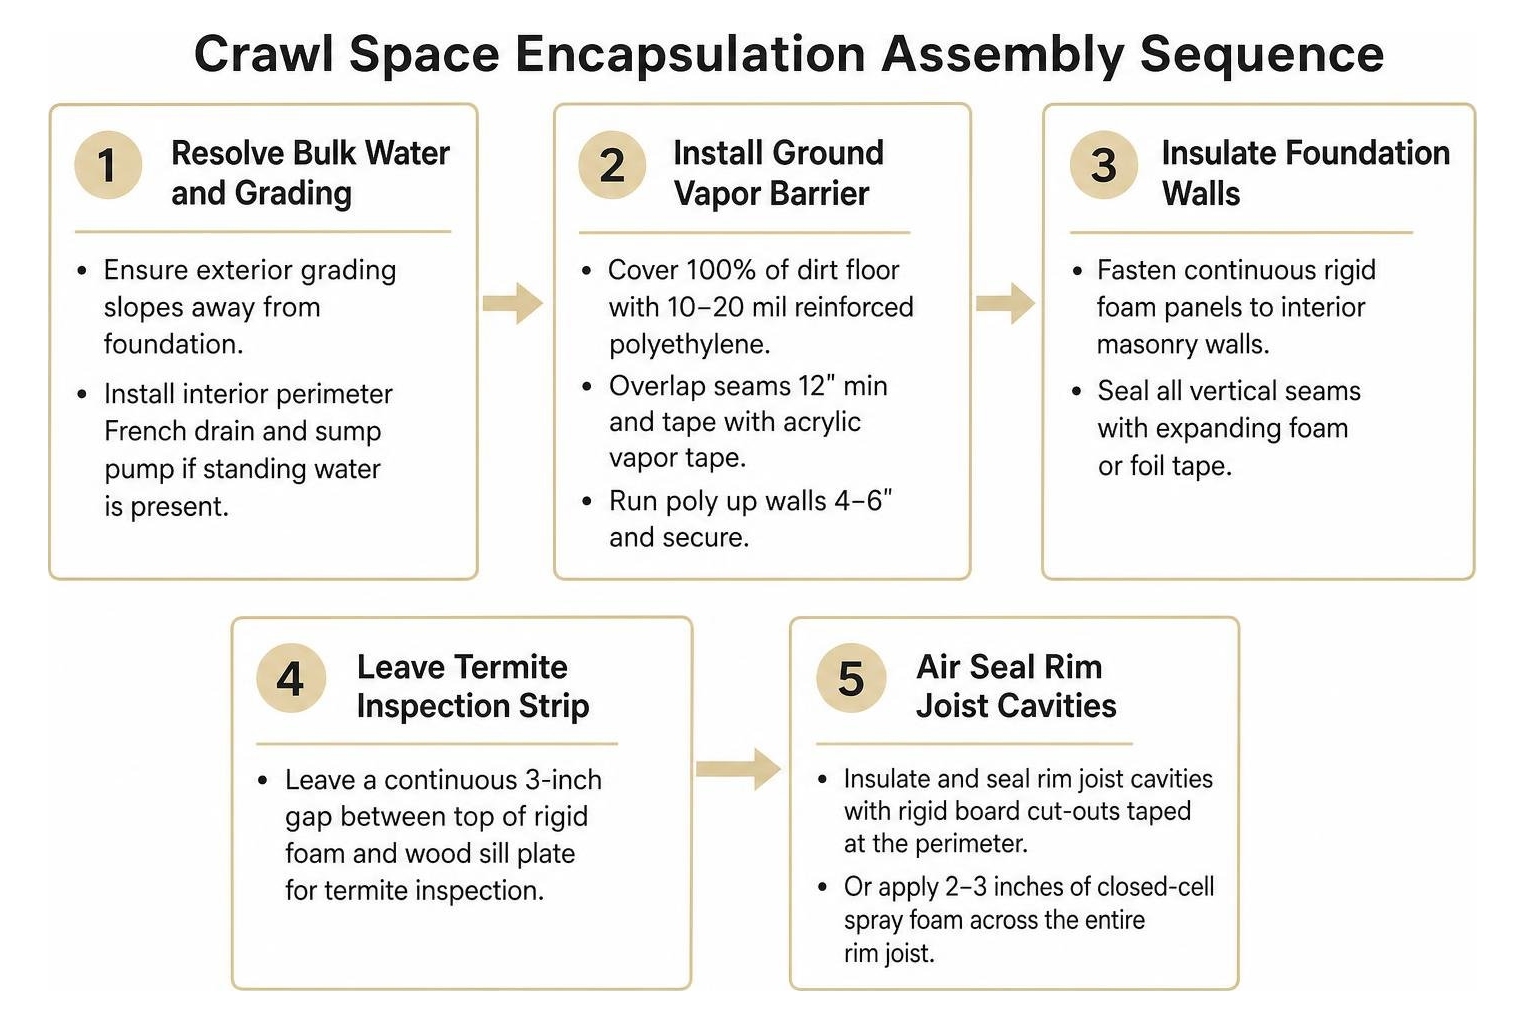
To build an unvented assembly using rigid foam board or spray foam, follow these step-by-step methods outlined in the PNNL guide to unvented insulated crawlspaces:
- Resolve Bulk Water and Grading: Ensure exterior site grading slopes away from the foundation. Install an interior perimeter French drain and sump pump system if standing water is present.
- Lay the Heavy-Duty Ground Vapor Barrier: Cover 100% of the exposed dirt floor with a continuous 10-mil to 20-mil reinforced polyethylene vapor barrier. Overlap all seams by at least 12 inches, tape the joints with heavy-duty acrylic vapor tape, and run the poly up the foundation walls 4 to 6 inches, securing it mechanically or with polyurethane mastic.
- Insulate Foundation Walls: Fasten continuous panels of unfaced expanded polystyrene (EPS), extruded polystyrene (XPS), or polyisocyanurate rigid foam directly to the interior masonry walls using masonry fasteners with wide plastic washers. Seal all vertical seams between boards with expanding foam or foil tape.
- Leave a Termite Inspection Strip: In areas prone to subterranean termites, leave a continuous 3-inch uncovered gap between the top of the rigid foam insulation and the wood sill plate to allow pest inspectors to detect insect mud tubes.
- Air Seal the Rim Joist Cavities: The wood rim (band) joist resting on the masonry foundation wall is responsible for massive air infiltration. Insulate and seal these cavities using continuous rigid board cut-outs taped at the perimeter, or apply 2 to 3 inches of closed-cell spray foam across the entire band joist.
For maximum longevity and airtightness, installing sealed crawl space spray foam insulation across the foundation walls and rim joists provides both thermal insulation and an impermeable Class II vapor retarder in a single seamless application.
Prioritizing Upgrades: Which Project Delivers the Fastest Return on Investment?
Homeowners managing home improvement budgets often wonder whether to tackle the top or bottom of the house first. While both spaces directly impact energy bills, they solve different primary comfort and building durability challenges.
Comparing Costs, Payback Periods, and Warning Signs of Failure
Understanding the average costs, expected energy bill reductions, and clear warning signs helps homeowners pinpoint where insulation failure is costing them the most:
| Metric / Attribute | Attic Insulation Upgrade | Crawl Space Encapsulation & Insulation |
|---|---|---|
| Typical Cost Range | $1,500 – $3,500 | $1,500 – $4,000 (Insulation only) / $4,500 – $10,000+ (Full Encapsulation) |
| Expected Energy Bill Savings | 10% to 20% on heating/cooling | 10% to 20% overall |
| Average Payback Period | 2 to 5 years | 5 to 8 years |
| Expected Lifespan | 20 to 50+ years (material dependent) | 15 to 20+ years |
| Primary Failure Indicators | Hot upstairs rooms in summer, ice dams in winter, high AC runtime, cold ceilings | Musty earth odors, cupping hardwood floors, cold first-floor surfaces, mold on joists, indoor relative humidity > 60% |
Attic insulation typically offers the fastest monetary payback because heat loss through the ceiling accounts for roughly 25% of a home's total winter heat loss. However, if your home exhibits high indoor humidity, rotting subflooring, or strong musty odors, crawl space remediation takes precedence to prevent costly structural repairs.
Determining the Best Material for Attic and Crawl Space Insulation Projects
Choosing the right insulation material depends heavily on accessibility, moisture exposure, and local building configurations:
- Blown-In Cellulose & Loose-Fill Fiberglass: Excellent, cost-effective options for dry attic floors. They fill voids around irregular joists easily but provide zero resistance to bulk moisture and require prior air sealing.
- Continuous Rigid Foam Board (XPS/Polyiso): Ideal for flat masonry crawl space walls. Provides stable R-values (R-5.0 to R-6.5 per inch) and creates a smooth thermal break across concrete block or poured walls.
- Open-Cell Spray Foam: Expands significantly (R-3.6 to R-4.0 per inch) to fill deep roof rafter cavities in conditioned attics. Provides exceptional sound dampening and air sealing, though it is vapor-permeable and unsuitable for below-grade, damp crawl space walls.
- Closed-Cell Spray Foam: The gold standard for crawl space rim joists, foundation walls, and demanding attic rooflines. Delivering R-6.0 to R-7.0 per inch, it cures into a dense, rigid matrix that repels water, stops air leaks completely, adds structural rigidity, and serves as an airtight vapor barrier at 2 inches of thickness.
Frequently Asked Questions About Home Insulation Upgrades
Should I insulate my attic or crawl space first for maximum energy savings?
For pure thermal payback and rapid energy reduction, the attic is almost always the best place to start. Upgrading thin attic insulation from R-11 or R-19 to current DOE targets (R-38 to R-60) cuts heating costs by up to 20% in cold weather and delivers a return on investment in just two to five years.
However, if your crawl space shows signs of standing water, rotting wood framing, or indoor relative humidity consistently above 60%, address the crawl space first. Protecting your home's structural framing and family indoor air quality from moisture damage and mold should always outweigh short-term energy payback calculations.
Why do traditional fiberglass batts fail inside humid crawl spaces?
Fiberglass batts are porous and rely on trapped pockets of stagnant air within their glass fibers to resist heat flow. In humid or vented crawl spaces, the batts absorb ambient moisture and condensation from cold wood surfaces. As the batts absorb water, the fiberglass fibers compress under the added weight, drastically lowering the material's effective R-value.
Eventually, the waterlogged batts pull away from the subfloor, creating air gaps where cold or hot air circulates directly under your flooring. Fallen fiberglass batts also trap organic dust and debris against wooden joists, creating a prime breeding ground for surface mold and wood-destroying fungi.
Can I install an attic fan along with new blown-in or spray foam insulation?
Yes, but only in traditionally vented, unconditioned attics. In a standard attic where insulation sits flat on the attic floor, a solar or electric attic exhaust fan can help expel trapped summer heat and balance airflow alongside properly installed soffit baffles.
However, you should never install an attic exhaust fan if you have a conditioned (unvented) attic insulated along the roofline with spray foam. In a spray foam roof deck assembly, the attic space is intentionally sealed and brought inside the home's conditioned thermal envelope. Running an exhaust fan in a sealed spray foam attic will depressurize the room, suck conditioned air out of your living spaces, and waste substantial HVAC energy.
Conclusion
Creating a comfortable, energy-efficient home requires looking at your house as an interconnected system. By pairing comprehensive attic air sealing with a sealed, moisture-controlled crawl space, you stop the stack effect at both ends, eliminate hot and cold spots, protect your indoor air quality, and keep your utility bills low year-round.
At Sweet Home Spray Foam, we specialize in high-performance spray foam insulation and concrete lifting across Virginia, serving homeowners throughout Richmond, Roanoke, Lynchburg, and Smith Mountain Lake. We believe in providing clear upfront pricing, rapid, pressure-free service, and practical guidance on local energy rebates to maximize your home improvement return.
Ready to transform your home's comfort from top to bottom? Contact us today to schedule a detailed assessment and explore our expert residential insulation services.