
Expanding Horizons: A Practical DIY Guide to Aerosol Spray Foam
Aerosol Spray Foam: A Simple Way to Seal Small Drafts

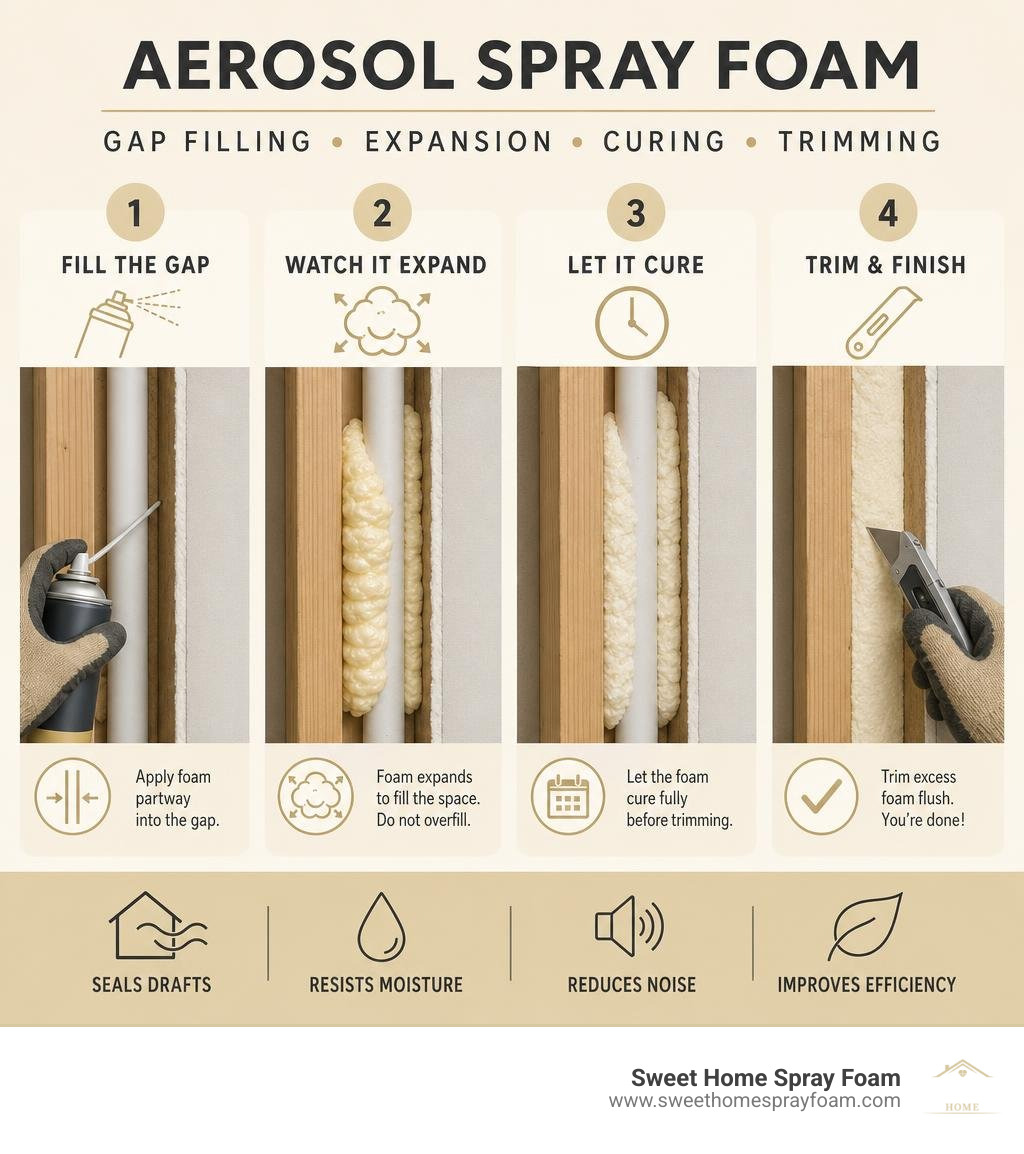
Aerosol spray foam is a ready-to-use expanding sealant for small gaps, cracks, and holes. For a DIY weatherization project, use it to seal air leaks around plumbing pipes, electrical penetrations, rim joists, and exterior framing. Choose a low-expansion formula near windows and doors, apply only partway into the gap, and let the foam expand and cure before trimming it.
This small can will not replace a full insulation system. But it can close the overlooked openings that let conditioned air escape and outdoor air enter. For Virginia homeowners dealing with drafts, uneven rooms, and high utility bills, targeted air sealing can be a practical first step toward a tighter thermal envelope.
Most aerosol products are one-component polyurethane foams. They cure as they react with moisture in the air. Product details vary, but many are tack-free within minutes and fully cured within about 24 hours. Always check the label for the approved gap size, working temperature, fire rating, and whether the product is rated for indoor or outdoor use.
Understanding Aerosol Spray Foam Types and Formulations
Aerosol expanding foam relies on one-component polyurethane chemistry stored under pressure with a liquefied propellant. When you depress the trigger, the prepolymer liquid is forced through the nozzle. As it meets the atmosphere, it reacts with ambient humidity to initiate a chemical cross-linking process known as moisture curing.
During this reaction, carbon dioxide bubbles form within the liquid matrix, driving the expansion dynamics that allow a relatively small volume of liquid to fill large, irregular cavities. Standard consumer aerosol cans (typically ranging from 12 oz to 20 oz) produce substantial yield volumes—often between 1.2 and 12 cubic feet of cured material depending on the expansion ratio and nozzle design. Specialty wide-spray cans can even yield up to 11 theoretical board feet per 20 oz canister.
Understanding the specific internal cell structure of the foam you choose is critical to selecting the right product for your project.
| Feature / Characteristic | Open-Cell Aerosol Foam | Closed-Cell Aerosol Foam |
|---|---|---|
| Cell Structure | Spongy, interconnected air pockets | Dense, compact sealed microscopic cells |
| Typical Density | ~0.5 lbs/cu. ft. (Low-Density) | ~1.75 to 3.0 lbs/cu. ft. (Medium/High-Density) |
| R-Value per Inch | R-3.5 to R-3.7 | R-5.0 to R-6.5 |
| Expansion Ratio | High expansion (20x–30x) | Controlled to high expansion (2x–10x) |
| Vapor Permeability | Permeable (allows water vapor through) | Impermeable (acts as moisture/vapor barrier at >80% closed cells) |
| Flexibility / Strength | Flexible, soft, forgiving | Rigid, firm, adds structural integrity |
| Primary Use Cases | Interior acoustic dampening, non-structural gaps | Exterior sealing, rim joists, moisture barriers, high R-value seals |
Open-Cell vs. Closed-Cell Formulations
The primary distinction in polyurethane foam chemistry lies between open-cell and closed-cell structures.
Open-cell formulations feature low density (around 0.5 lbs/cu. ft.). The cell walls rupture during the expansion phase, leaving microscopic open pockets that trap air. This structure provides an R-value of roughly R-3.5 to R-3.7 per inch. Because the cells are open, this foam remains flexible and vapor-permeable. While it stops moving drafts dead in their tracks, it will not prevent water vapor transmission, making it ideal for interior wall partitions where acoustic dampening and low-pressure expansion are desired.
Closed-cell formulations, by contrast, lock gas inside unbroken, dense polymeric pockets. With densities ranging from 1.75 to 3.0 lbs/cu. ft. in aerosol formulations, closed-cell foams deliver exceptional thermal resistance—often R-5.0 to R-6.5 per inch. With a closed-cell content exceeding 80%, these foams block bulk water, resist vapor diffusion, and cure into a rigid plastic that adds structural rigidity to the surfaces it bonds with.
Specialty Formulations: Fireblock, High-Expansion, and Pest Defense
Not all DIY sealing jobs have the same requirements. Manufacturers engineer targeted formulations by altering the base chemistry:
- Fireblock and Flame-Retardant Foams: Formulated to resist flame spread and meet stringent building codes, these products are tested under ASTM E84 (surface burning characteristics) and often carry UL 2818 and GREENGUARD certifications for low chemical emissions. Identifiable by an orange or red tint, they impede the transfer of smoke, toxic gases, and flames through service penetrations across floor and wall assemblies.
- Pest and Rodent Defense: Mice and insects can chew through standard foam. Pest-resistant formulations incorporate bittering agents, biocides, or specialty barrier compounds that deter pests without compromising air-sealing efficiency.
- UV-Resistant and Landscape Formulations: Standard polyurethane foam degrades quickly when exposed to sunlight, turning brittle, brown, and powdery. Specialized outdoor products, like DAP® Black Insulating Foam – Aerosol (20oz Can) | DAP, use carbon-rich pigmentation and UV stabilizers to endure exterior weather without requiring immediate paint or protective coatings.
- Multi-Purpose Construction Sealants: For standard building projects, heavy-duty formulations like industrial Spray Foam Insulation provide high-yield gap filling across common substrates such as wood, masonry, and metal.

Key Technical Specifications for DIY Sealing Projects
Before pulling the trigger on an aerosol can, review the technical data sheet to match the product's physical properties to your project conditions. For instance, reviewing detailed Technical Data Sheet specifications helps you verify properties like shear adhesion, density, and cure profile before application.
- Thermal Conductivity & R-Value: Measures how effectively the cured foam resists conductive heat flow. Standard aerosol polyurethane typically exhibits low thermal conductivity (0.16–0.20 BTU·in/(hr·ft²·°F)), translating to an R-value between 3.6 and 6.0 per inch.
- Tack-Free Time: The duration after dispensing until the outer foam skin is no longer sticky to the touch. Most aerosol foams become tack-free in 7 to 12 minutes under normal humidity.
- Full Cure Window: The total time required for the internal chemical matrix to reach maximum dimensional stability and load-bearing strength—typically 8 to 24 hours. Quick-cure variants can achieve initial firmness in 3 minutes and full strength in just 1 hour.
- Theoretical Board Feet / Coverage: One board foot equals a 12-inch by 12-inch area at a 1-inch thickness (144 cubic inches). A 12 oz can might yield 16 square feet at a 1/2-inch thickness, while a wide-spray 20 oz can covers up to 11 theoretical board feet.
- Working Temperature Range: Polyurethane chemistry requires specific ambient and substrate temperatures to cure properly. While some specialized formulas operate from 45°F to 120°F, standard foams perform best when both the can and ambient air are between 60°F and 80°F.
Selecting the Right Aerosol Spray Foam Dispenser
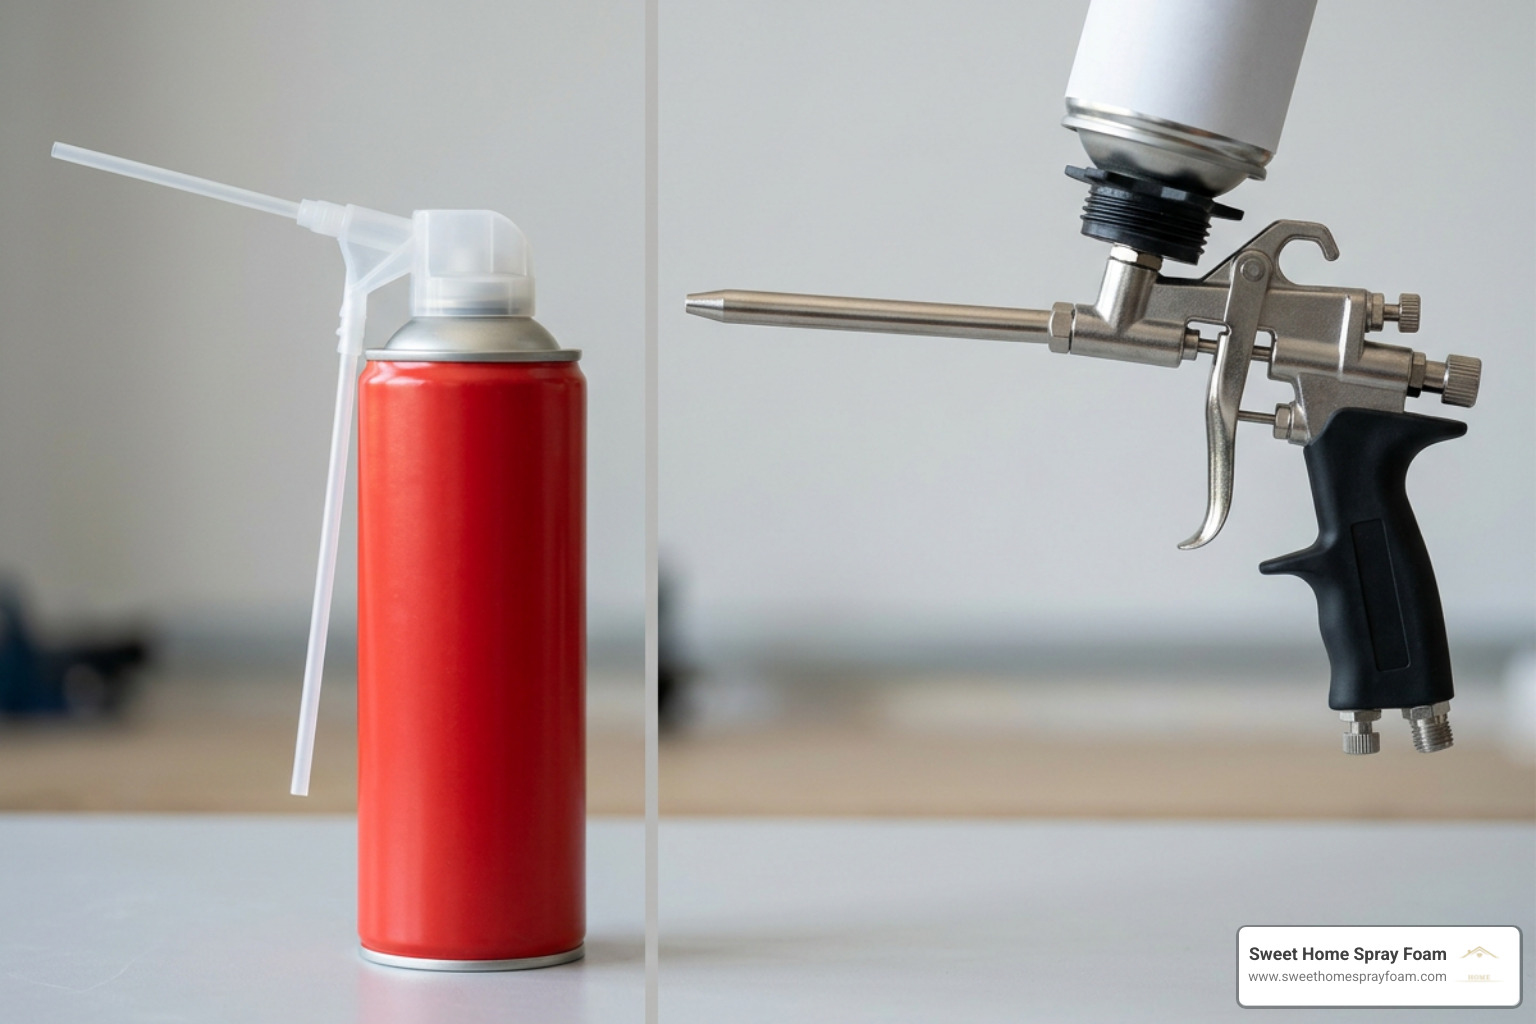
The application tool you use directly impacts your precision, waste control, and cleanup effort:
- Plastic Straw Applicators: Disposable straw nozzles screw directly onto the can valve. They are inexpensive and well-suited for single, quick repairs. However, they provide minimal control over flow rate, tend to splatter, and cannot be cleanly paused. Once the foam begins curing inside the narrow plastic straw (usually within 15 to 20 minutes of inactivity), the remainder of the can becomes difficult or impossible to dispense.
- Professional Dispensing Guns: Reusable metal foam applicator guns screw onto specialized threaded canisters. These guns feature an adjustable flow screw at the rear, allowing you to calibrate the bead width from a pencil-thin line to a heavy flow. Releasing the trigger creates an airtight mechanical seal at the needle tip, preventing the chemical in the can from curing between uses. A single canister can remain mounted on a gun for weeks without clogging. Cleaning requires attaching an aerosol can of acetone solvent to flush the barrel.
Thermal Performance and Energy Savings
Unsealed penetrations allow convective air currents to bypass bulk insulation, pulling cold air into your living spaces during winter and drawing humid, heated air inside throughout humid Virginia summers.
Air infiltration accounts for up to 40% of the energy used to heat and cool a typical home. While materials like fiberglass batting allow air to pass directly through porous fibers, polyurethane spray foam creates an airtight seal that physically blocks air currents. Reviewing the fundamentals of traditional vs spray foam insulation shows why stopping air leakage at framing transitions and utility penetrations yields immediate energy savings and lowers HVAC runtimes.
Step-by-Step Guide to Applying Aerosol Spray Foam
Applying expanding foam effectively requires steady technique, careful surface preparation, and the patience to let the chemistry work.
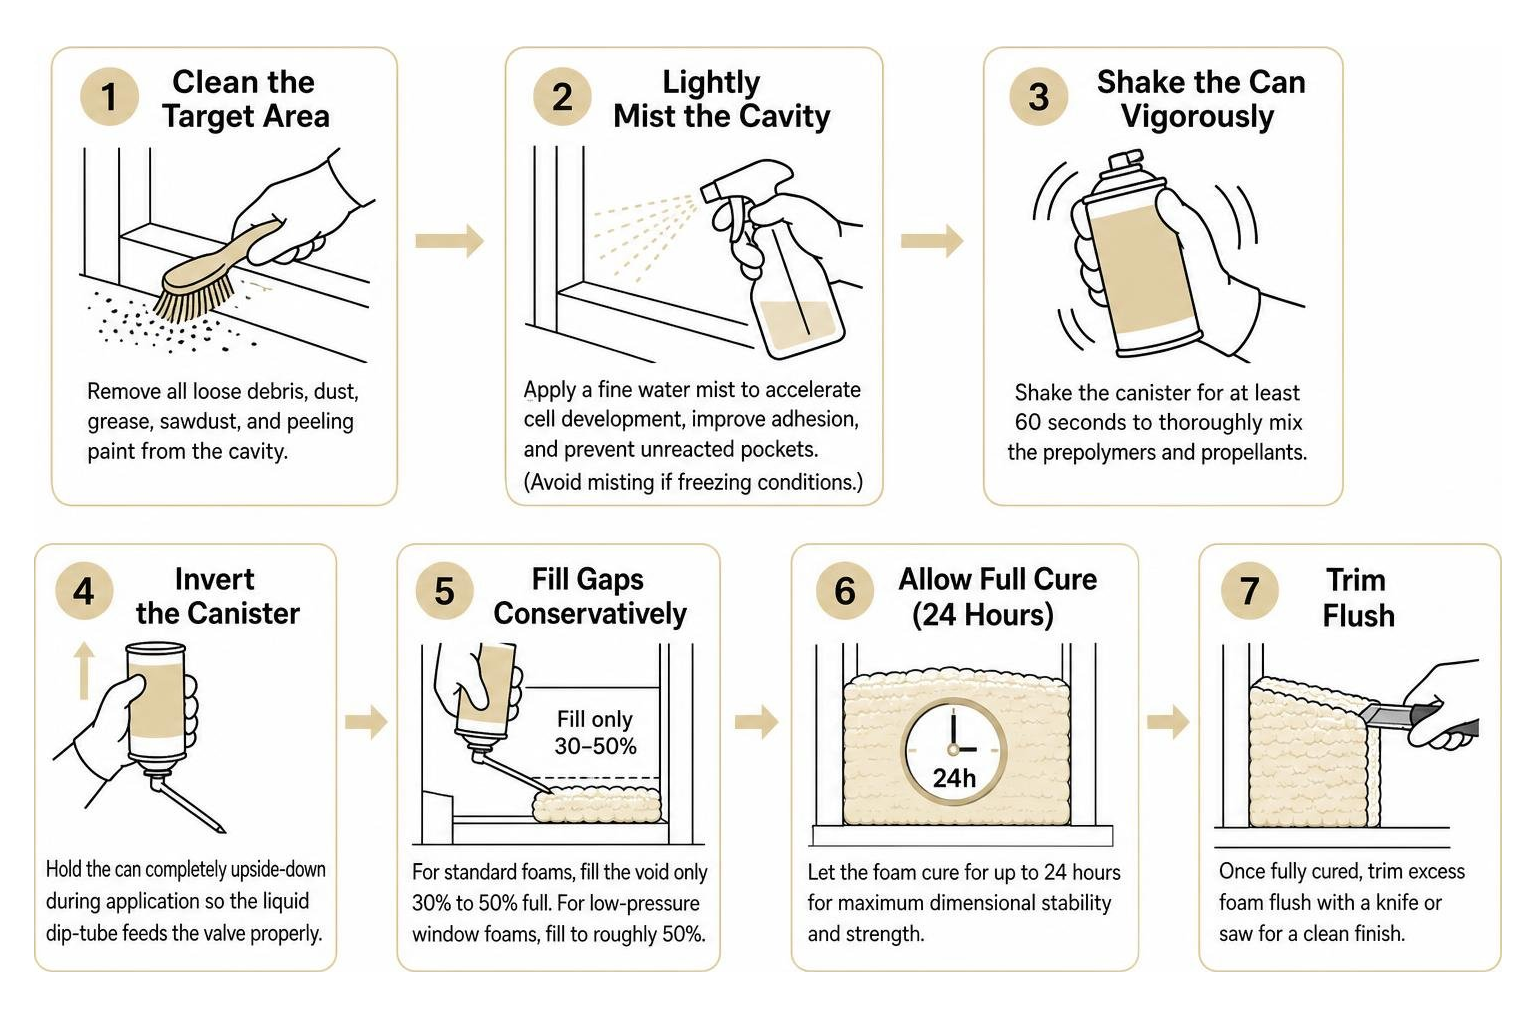
- Clean the Target Area: Remove all loose debris, dust, grease, sawdust, and peeling paint from the cavity. Foam requires a clean substrate for proper adhesion.
- Lightly Mist the Cavity: Polyurethane is a moisture-cured polymer. Using a handheld spray bottle to apply a fine water mist to masonry, wood, or drywall accelerates cell development, improves structural adhesion, and prevents unreacted pockets in deep voids. (Avoid misting if working in freezing conditions).
- Shake the Can Vigorously: Shake the canister for at least 60 seconds to thoroughly mix the prepolymers and propellants.
- Invert the Canister: Standard aerosol cans must be held completely upside-down during application so the liquid dip-tube feeds the valve properly without venting only propellant gas.
- Fill Gaps Conservatively: For standard expansion foams, fill the void only 30% to 50% full. For low-pressure window formulations, fill to roughly 50%. Allow the chemical reaction to expand the material to fill the remainder of the cavity.
- Let It Cure Completely: Do not touch or manipulate wet foam. Allow 10 to 15 minutes for it to skin over, 45 minutes before attempting any initial cuts, and a full 8 to 24 hours for complete curing.
- Trim and Finish: Once the core is fully cured, slice away excess foam flush with the wall surface using an extendable utility knife or a serrated blade. If the foam is exposed to direct sunlight, apply an exterior-grade paint, caulk, or sealant over the cut edge to prevent UV degradation.
Surface Preparation and Environmental Conditions
Foam will not bond well to wet, oily, or dusty surfaces. Masonry, concrete, wood, and metal are excellent substrates provided they are dry, structurally sound, and clean.
Avoid applying foam in ambient temperatures below 45°F or above 120°F unless the label specifically indicates cold-weather capability. In unheated winter spaces, cold canisters will produce sluggish, runny foam with poor yield; warm the cans in a room-temperature water bath (never over open heat or direct flame) prior to application.
Essential Personal Protective Equipment (PPE):
- Nitrile or Neoprene Gloves: Uncured foam adheres aggressively to skin and cannot be washed off with soap and water once it begins to cure.
- Safety Goggles or Face Shield: Protects eyes from accidental splatter and pressurized blowback.
- Respirator / Well-Ventilated Workspace: When working in confined basements, crawl spaces, or attics, use an organic vapor respirator cartridge to avoid inhaling propellant gases and isocyanate vapors.
- Long Sleeves and Work Clothing: Protects exposed arms and skin from accidental drips.
Best Practices for Applying Aerosol Spray Foam Around Openings
Different parts of a home require different application approaches:
- Window and Door Jambs: Standard high-expansion foam can exert enough outward pressure as it cures to bow vinyl, wood, or aluminum window jambs, making windows and doors stick or bind. Always select a certified low-pressure, low-expansion window and door foam. Apply a continuous, thin bead into the shim space, filling no more than 40% to 50% of the depth.
- Plumbing Penetrations: For gaps around PVC drain lines, copper supply pipes, and PEX tubing through subfloors or drywall, use a general-purpose closed-cell expanding foam. Fill the void around the pipe to block drafts and prevent pests from traveling through floor levels.
- Electrical Rough-Ins and Outlet Boxes: Use orange-tinted fireblock foam around electrical boxes and wall penetrations. Never spray foam inside the electrical junction box itself—apply it strictly around the exterior perimeter where the box meets the drywall or framing stud.
- HVAC Duct Boots and Rim Joists: Seal the joint where metal ductwork penetrates the floor or ceiling sheathing to prevent conditioned air from being drawn into wall cavities. On rim joists, apply a wide-bead closed-cell foam along the wood-to-foundation connection to block outdoor air infiltration. For larger surface areas, consider a multi-can kit like the Wall and Cavity Foam 20 oz. Aerosol Spray Foam Sealant with Wide Spray Applicator (6-Pack) to achieve even coverage.
When to Choose DIY Cans vs. Whole-Home Professional Applications
Aerosol cans are practical tools for air-sealing small gaps, localized penetrations, and individual framing joints. However, attempting to insulate entire wall cavities, large attics, or comprehensive subfloors using 12 oz to 20 oz consumer cans is inefficient, costly, and can lead to uneven coverage.
A single 12 oz can covers approximately 1 to 1.5 board feet of volume, costing roughly $8 to $15 per unit. Insulating an entire 1,000-square-foot attic floor to code-compliant depths would require hundreds of individual cans, costing significantly more than commercial equipment while leaving inconsistent air barriers. For broader projects, exploring comprehensive insulation education helps clarify where DIY air sealing ends and commercial high-pressure spray foam systems become necessary.
Large Cavities, Attics, and Rooflines
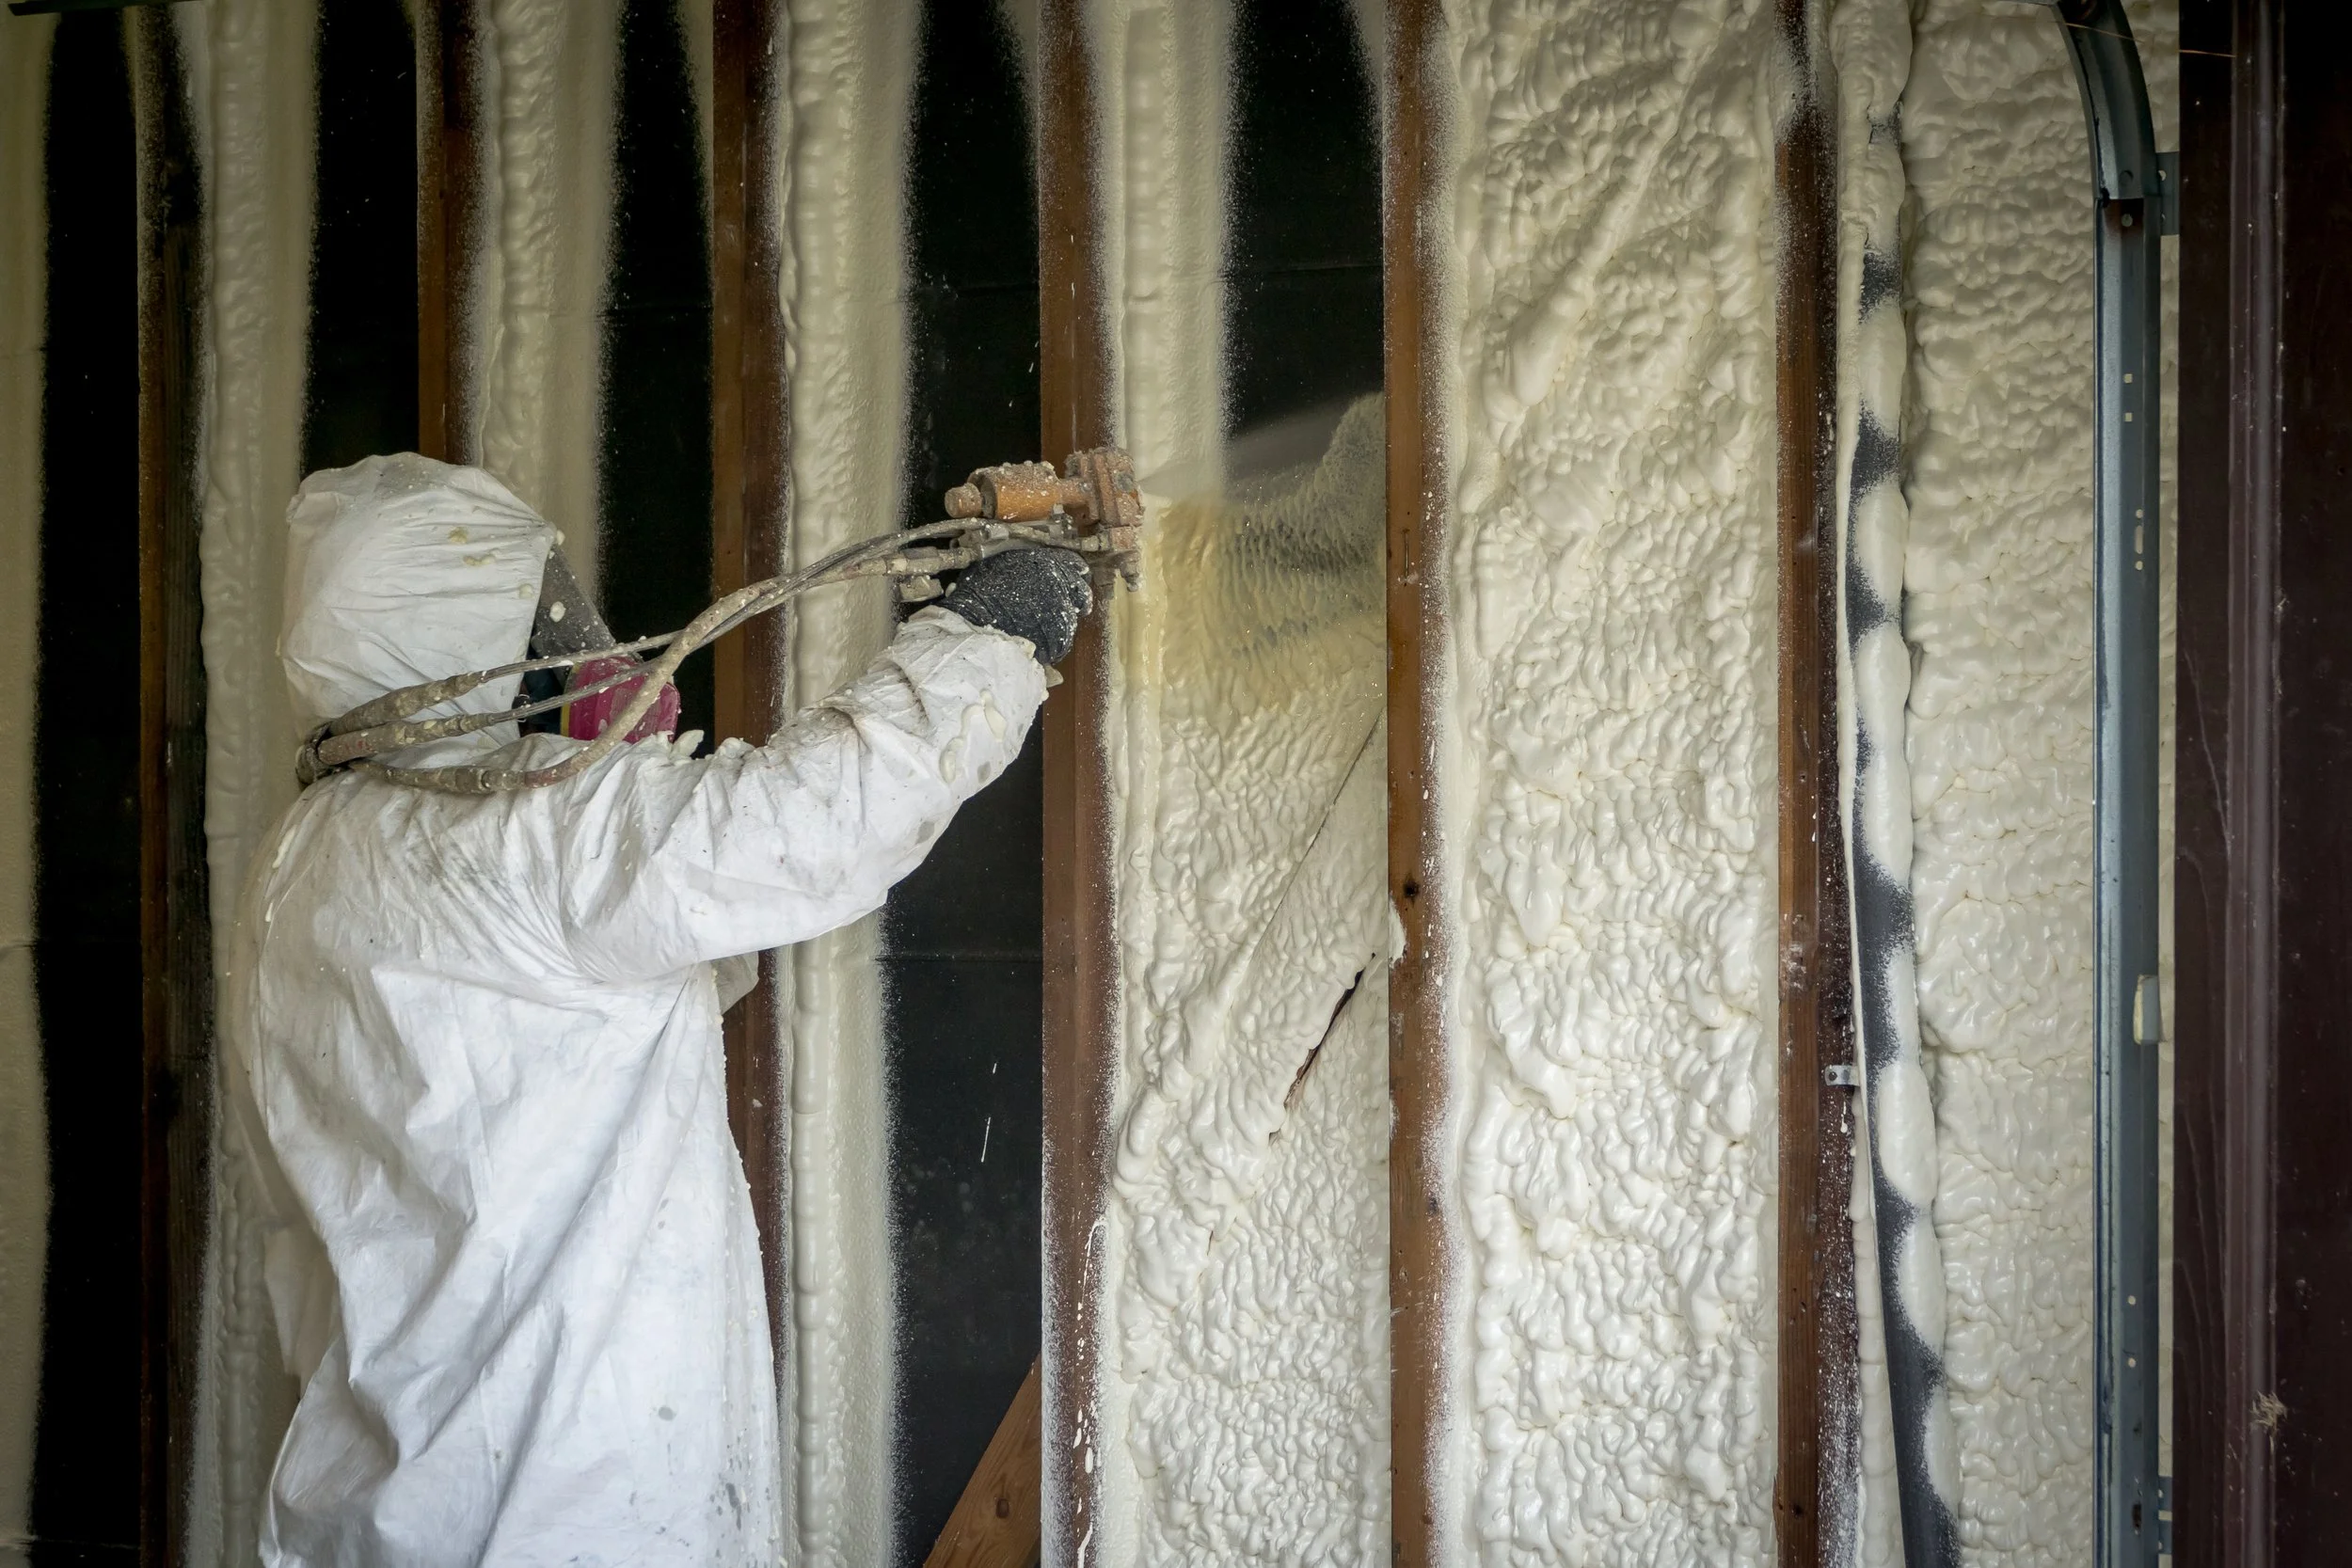
Insulating full building assemblies requires commercial two-component (A-side isocyanate and B-side polyol resin) high-pressure equipment. These systems mix heated chemicals at high pressures directly inside a specialized spray gun, generating seamless, monolithic insulation layers that expand rapidly across large square footages.
For attic spaces, applying attic spray foam insulation along the underside of the roof deck seals the building at the highest point of thermal loss, creating a conditioned, unvented attic assembly that protects HVAC equipment and ductwork. Similarly, complete wall retrofits benefit from full wall spray foam insulation, which seals stud cavities and delivers a continuous thermal barrier that DIY cans cannot match. When building from the ground up, new construction spray foam insulation integrates the thermal and air barrier into the framing phase, while commercial structures rely on specialized metal building spray foam insulation to stop condensation and thermal bridging across steel purlins.
Encapsulating Crawl Spaces and Subfloors
Crawl spaces in Virginia are vulnerable to high humidity, soil moisture evaporation, and rim joist air leakage. While aerosol cans can seal the occasional pipe penetration through a subfloor, comprehensive subfloor protection requires professional crawl space spray foam insulation.
Professional encapsulation applies continuous closed-cell spray foam directly to foundation walls and band boards, integrating the insulation with heavy-duty vapor retarders on the ground. This system seals out outdoor moisture, deters pests, prevents mold growth on joists, and stabilizes indoor temperatures throughout the home.
Frequently Asked Questions About Expanding Foam
What is the typical shelf life and storage requirement for aerosol cans?
Most aerosol foam canisters have an unopened shelf life of 12 to 18 months from the date of manufacture (printed on the bottom of the can). Store cans upright in a temperature-controlled area between 60°F and 80°F.
Never expose cans to open flames, direct sunlight, or temperatures exceeding 120°F, as the internal propellant is under pressure and can rupture the container. Storing cans horizontally can cause the internal valve to clog with settling chemical prepolymers.
To dispose of aerosol cans, discharge all remaining product into a disposable cardboard box, allow the foam to cure completely, and recycle or dispose of the empty metal container according to local municipal solid waste guidelines.
Can aerosol foam effectively soundproof interior walls?
Aerosol foam reduces sound transmission primarily by sealing the small flanking paths, air gaps, and cracks through which airborne sound waves travel (such as gaps around electrical boxes, baseboards, and HVAC duct penetrations).
Low-density open-cell foam can absorb airborne noise inside hollow wall cavities due to its flexible, open-cell matrix. However, closed-cell foam hardens into a rigid solid that can transmit structural vibrations across framing.
For comprehensive soundproofing, aerosol foam should be paired with sound-damping drywall, acoustic insulation, and resilient channel decoupling rather than relied on as a standalone sound barrier.
How do you safely remove overspray or cured foam from skin and surfaces?
Cleanup depends entirely on whether the foam is still wet or fully cured:
- Uncured Foam: If the foam is still tacky, apply acetone (or dedicated foam gun cleaner) to a clean shop rag and wipe it away immediately. Acetone dissolves unreacted polyurethane prepolymers quickly. Acetone will damage certain plastics, finished wood, and painted trim—test an inconspicuous area first.
- Cured Foam: Once polyurethane foam has cross-linked and cured, solvents like acetone, mineral spirits, and paint thinner will no longer dissolve it. Cured foam must be removed mechanically by scraping, sanding, or shaving with a razor blade.
- Foam on Skin: If foam cures on your skin, do not use harsh chemicals. Wash the area thoroughly with warm, soapy water, apply petroleum jelly or moisturizing lotion to soften the skin, and allow the foam to wear off naturally over 2 to 4 days through normal skin cell shedding.
Conclusion
Aerosol expanding foam is one of the most effective tools available for DIY air sealing. By sealing small gaps around plumbing pipes, window jambs, electrical penetrations, and rim joist seams, you stop convective drafts, improve indoor comfort, and lower energy consumption across your home.
When your project extends beyond small gaps and into full attics, crawl space encapsulations, or whole-home thermal retrofits, professional equipment and expertise are required. If you're planning a larger project, you can learn how to find the best spray foam insulation contractors near you to evaluate qualified installers.
At Sweet Home Spray Foam, we specialize in high-performance spray foam insulation and concrete lifting across Virginia—including Richmond, Roanoke, Lynchburg, and Smith Mountain Lake. We provide clear, upfront pricing, fast and pressure-free service, and expert guidance on local utility rebates. Contact us today for a whole-home evaluation from our expert spray foam insulation services team, and let us help you create a comfortable, energy-efficient home.