Practical Attic Space Insulation Strategies for Modern Homeowners
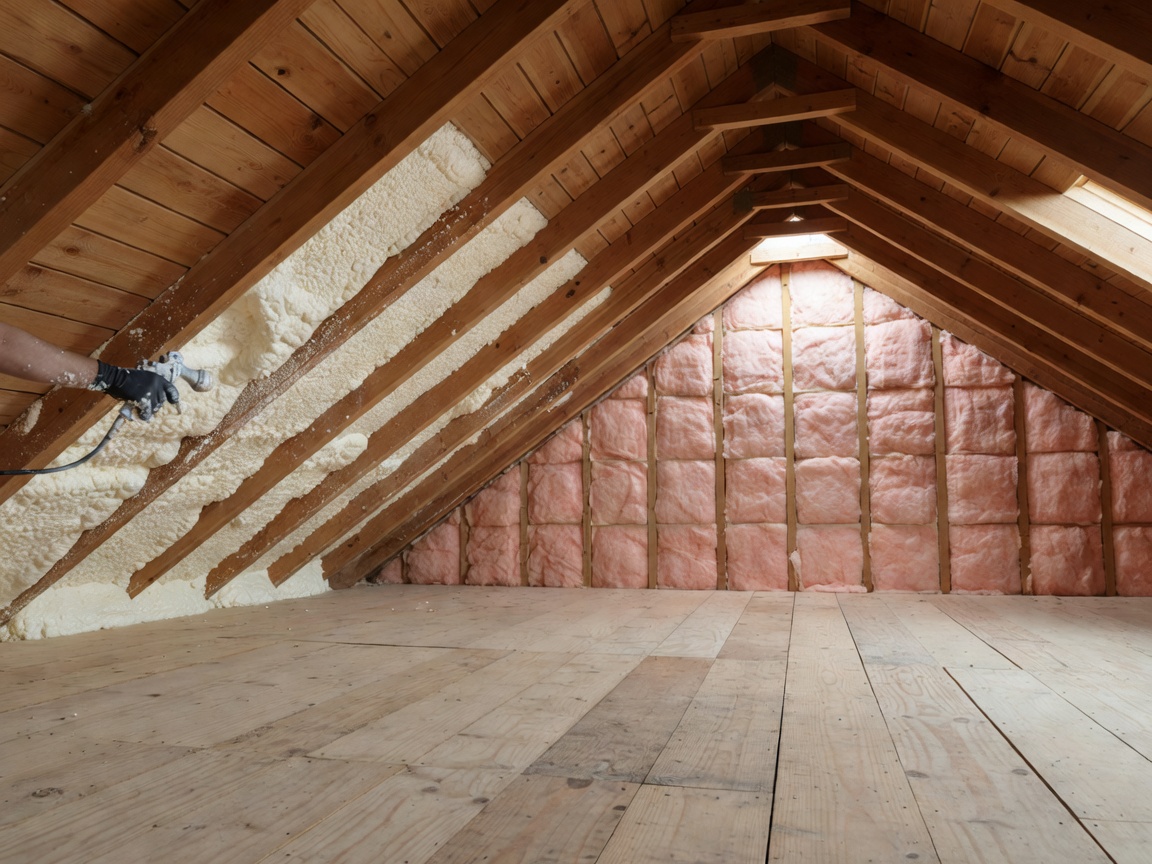
Start With Air Sealing, Then Insulate to the Right R-Value
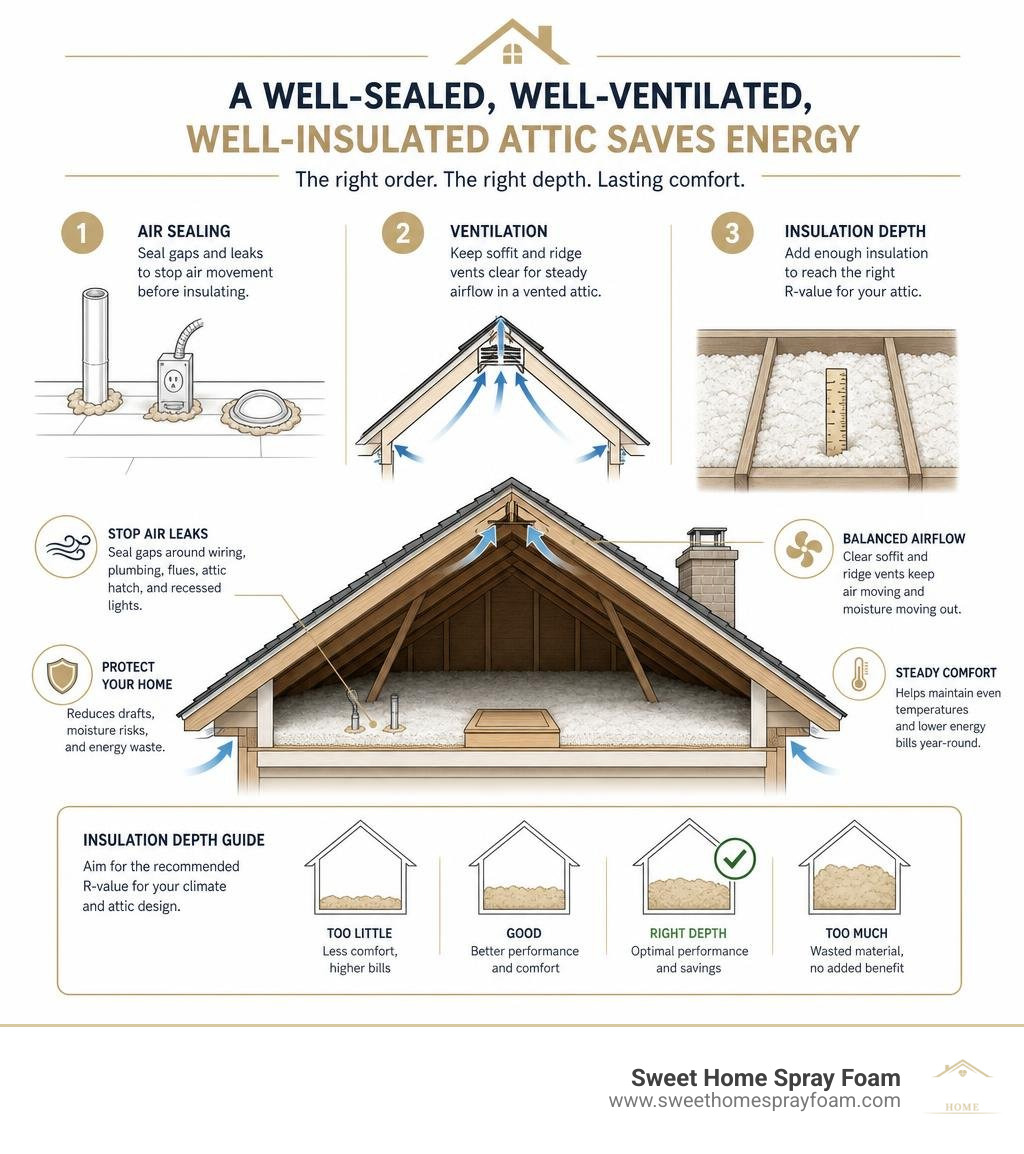
For most Virginia homes, the practical attic space insulation strategy is simple: air seal the attic floor first, keep ventilation paths open in a vented attic, then add enough insulation to reach the recommended R-value for your climate and attic design. Blown-in cellulose or fiberglass often works well for an unfinished attic floor. Spray foam is usually the stronger choice when the attic will be conditioned, finished, or used to house HVAC equipment.
A well-sealed, well-insulated attic can reduce drafts, uneven room temperatures, and wasted heating and cooling energy. ENERGY STAR reports that sealing and insulating can cut annual heating and cooling costs by up to 20%.
The key is not just adding more material. Insulation cannot perform as intended when warm, moist indoor air leaks through gaps around wiring, attic hatches, recessed lights, and plumbing penetrations. The right approach also depends on whether your home has a traditional vented attic or an unvented roof-deck assembly.
This guide explains how to assess your attic, select materials, avoid moisture and safety problems, and find available incentives before you invest.
Assessing Need: Attic Floor vs. Roof Deck Insulation
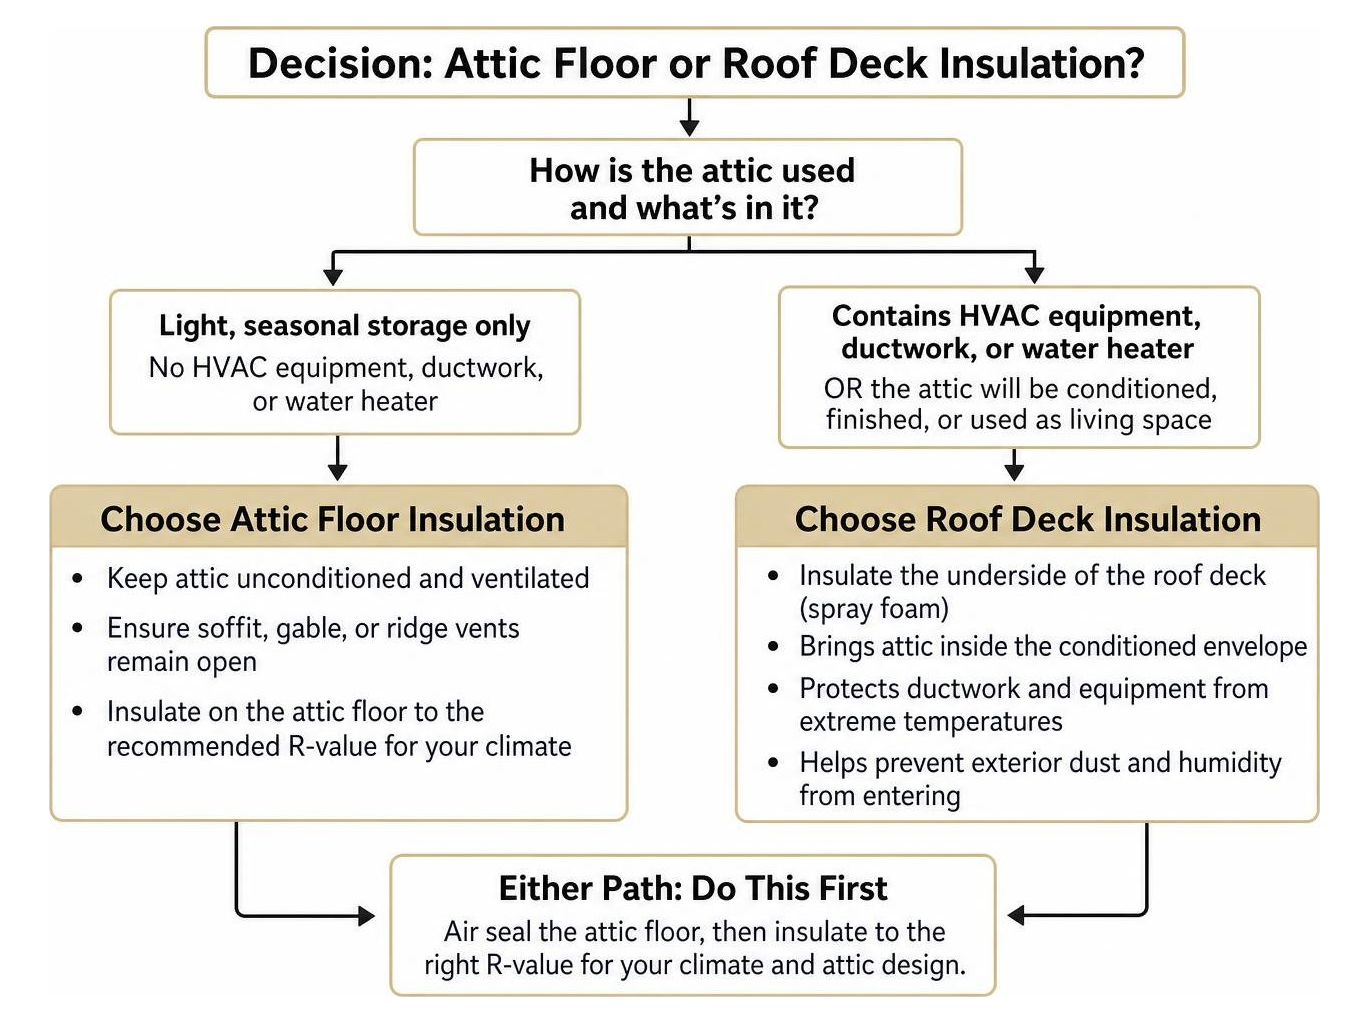
Before picking up a single tool or purchasing materials, you must establish where the thermal boundary of your home belongs. Insulating the wrong plane can lead to trapped moisture, wasted materials, and high energy bills.
In a traditional setup, the thermal boundary sits directly on the attic floor. This configuration creates an unconditioned attic where outside air circulates freely above the insulation through soffit, gable, or ridge vents. Insulating the attic floor is an effective, budget-conscious choice when you only use the attic for light, seasonal storage and have no mechanical systems installed up there.
If your air handler, ductwork, or water heater resides in the attic, insulating the floor forces those systems to operate in extreme temperatures. An unconditioned Virginia attic can soar past 130°F in July and drop below freezing in January. Under those conditions, conditioned air inside sheet metal ducts loses substantial energy before ever reaching your living areas.
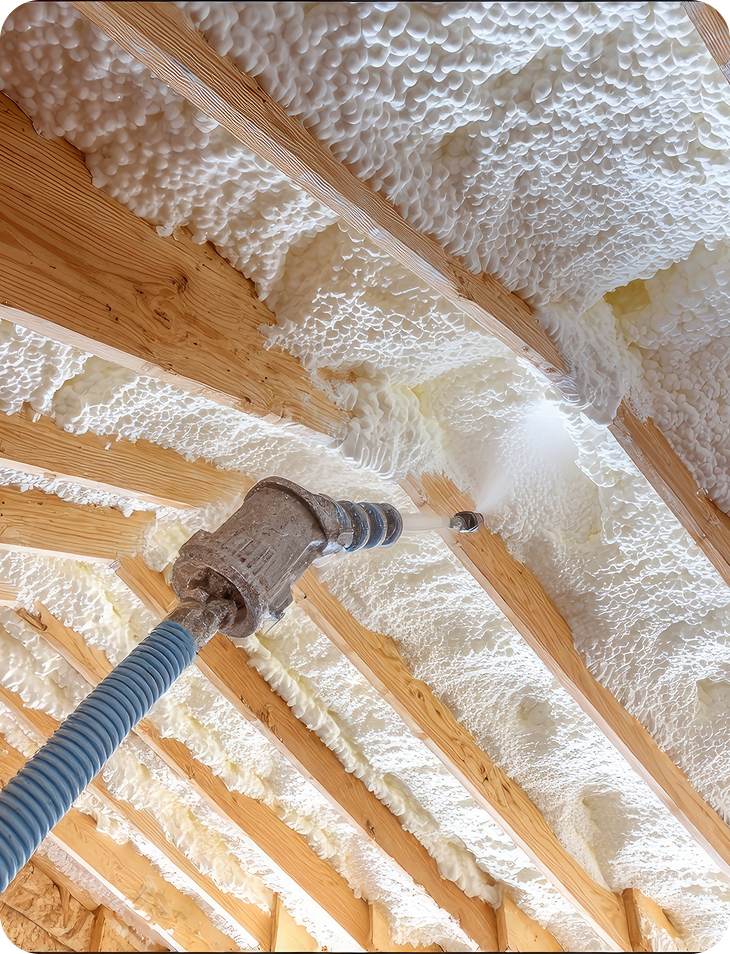
Moving the thermal boundary to the roof deck changes the equation. Applying attic spray foam insulation directly to the underside of the roof sheathing brings the entire attic inside the conditioned building envelope. This eliminates extreme temperature swings, protects ductwork from thermal loss, and prevents exterior dust and humidity from infiltrating your home. To learn more about standard configurations, review the ENERGY STAR Attic Insulation Guidelines.
Assessing Current Attic Space Insulation and Warning Signs
According to data from the U.S. Department of Energy, the average American home loses roughly 25% of its heat straight through the roof and attic when thermal barriers are insufficient. You can evaluate your current setup with a quick visual inspection using a standard tape measure.
Climb up into the attic opening with a flashlight and check the floor joists:
- Joists are clearly visible: If the insulation sits level with or below the top of the 2x6 or 2x8 floor joists (roughly 5.5 to 7.25 inches), you have an R-value of roughly R-15 to R-22. Your home is significantly under-insulated by modern energy standards.
- Joists are completely covered: If you see a uniform blanket of material that rises several inches above the framing timbers, your attic has a healthier thermal barrier, though it may still fall short of current code targets (typically R-38 to R-60).
Beyond physical measurements, your living areas often signal thermal failure. Keep an eye out for these everyday warning signs:
- Drafts moving across ceilings or around ceiling fixtures.
- Significant temperature differences between upstairs bedrooms and main-floor living spaces.
- High winter heating bills paired with air conditioning that runs non-stop during summer afternoons.
- Ice dams forming along roof eaves during winter freezes, caused by warm interior air escaping into the attic and melting snow on the upper roof deck.
Handling Hazards: Damaged Insulation, Mold, and Vermiculite
Before adding new thermal layers, address any existing health or structural hazards. Placing fresh insulation over compromised materials will only trap problems and accelerate structural rot.
Inspect the attic floor and roof sheathing for past or active moisture intrusion. If you find wet, compressed, or moldy fiberglass batts, remove and dispose of them properly. Find and repair the source of the roof leak before proceeding with insulation upgrades.
Exercise extreme caution with homes constructed prior to 1990:
- Vermiculite Insulation: This loose, pebble-like, gray-brown material often contains naturally occurring asbestos fibers. If you spot vermiculite, do not sweep, vacuum, or disturb it. Have a sample tested by a certified laboratory before doing any work in that space.
- Knob-and-Tube Wiring: Older electrical setups with exposed ceramic knobs and tubes require open air to dissipate heat. Blanketing live knob-and-tube wiring with thermal insulation creates a severe fire hazard. An electrician must inspect and decommission or update these circuits first.
- Chimney and Flue Clearances: Maintain a mandatory 2- to 3-inch clearance around metal flues and masonry chimneys using non-combustible sheet metal flashing and fire-rated sealants.
Selecting the Best Attic Space Insulation Materials and R-Values
Insulation performance is measured in R-value, which reflects a material's resistance to conductive heat flow. The International Energy Conservation Code (IECC) divides the country into distinct climate zones, prescribing minimum thermal resistance targets for attic assemblies:
- Climate Zones 1–2 (Deep South / Warm): R-30 to R-49
- Climate Zone 3 (Moderate South): R-38 to R-49
- Climate Zone 4 (Mid-Atlantic / Virginia): R-49 to R-60
- Climate Zones 5–8 (Northern / Cold): R-49 to R-60
| Material Option | Typical R-Value per Inch | Common Placement | Primary Strengths | Limitations |
|---|---|---|---|---|
| Blown-In Cellulose | R-3.5 – R-3.8 | Attic Floor | Dense coverage, fills joist voids, recycled content | Settles over time, requires air barrier beneath |
| Blown-In Fiberglass | R-2.2 – R-2.7 | Attic Floor | Lightweight, non-combustible, easy distribution | Prone to air washing, low density |
| Fiberglass Batts | R-3.0 – R-3.5 | Attic Floor / Rafters | Readily available, straightforward handling | Leaves gaps at wiring, compresses easily |
| Open-Cell Spray Foam | R-3.5 – R-3.8 | Roof Deck / Rafter Bays | Expands to seal irregular cavities, sound dampening | Permeable to bulk vapor, indoor use only |
| Closed-Cell Spray Foam | R-6.0 – R-7.0 | Roof Deck / Sheathing | Built-in vapor barrier, adds structural racking strength | Higher initial investment, requires professional rig |
| Rigid Foam Board (XPS/Polyiso) | R-5.0 – R-6.5 | Attic Hatches / Sheathing | High R-value per inch, rigid thermal break | Must be covered with fire-rated thermal barrier |
For a deeper dive into how modern materials compare against legacy batts, check out our guide on traditional vs spray foam insulation. Additional context on assembly methods can be found in this complete guide to attic insulation and this overview on how to insulate an attic.
Comparing Attic Insulation Materials: Spray Foam vs. Traditional Options
Loose-fill fibers and batt materials resist conductive heat transfer, but they do not stop convective air currents. When cold exterior air washes through attic vents across low-density fiberglass batts, the effective thermal resistance of the material drops.
Spray polyurethane foam addresses both conductive and convective heat transfer in a single application. As it cures, it expands into gaps, framing seams, and odd-shaped cavities, forming an air-impermeable seal.
Closed-cell spray foam delivers an exceptional R-6.5 to R-7.0 per inch of thickness. Because it rejects bulk moisture and acts as a vapor retarder at 2 inches of depth, it prevents humid interior air from reaching cold roof sheathing during winter. Open-cell foam expands rapidly at a lower density, making it an effective choice for filling deep rafter cavities while dampening sound transmission.
Vented vs. Unvented Conditioned Attic Assemblies
Understanding how an attic breathes helps you protect your roof framing from chronic moisture problems:
- Vented Attics: Outdoor air enters through soffit vents at the eaves, flows along the underside of the roof deck, and exits through ridge or gable vents. The ceiling plane below must be airtight, and baffles must keep the soffits clear.
- Unvented (Conditioned) Attics: All exterior vents are sealed. Spray foam is applied directly to the underside of the roof sheathing and gable walls, converting the attic into a semi-conditioned space that matches the temperature and humidity of the home.
When designing an unvented assembly in mixed or cold climates, building codes require adequate air-impermeable insulation to keep the condensation plane (the roof sheathing) above the interior air's dew point. For detailed building science protocols, see the Building America Guide to Unvented Attics and technical research on unvented roofs for conditioned attics.
Air Sealing and Moisture Control: The Essential Prerequisite
Air sealing is the most overlooked step in residential insulation projects, yet it directly governs whether your new materials succeed or fail.
Warm air rises through a home via the stack effect, carrying moisture and heat upward through hidden bypasses in the ceiling. Unsealed drywall seams, dropped soffits, plumbing chases, and electrical wire penetrations act like small chimneys. Without dedicated air sealing, this air movement bypasses loose insulation entirely, cutting effective system performance by up to 30% to 50%.
For additional technical background on managing these boundary layers, explore our curated insulation education resources.
Sealing Penetrations, Flues, and Recessed Lights
Air sealing requires systematically working across the attic floor before laying down any loose-fill or batt products:
- Top Plates and Wire Chases: Locate the framing lines where interior walls meet the attic space. Apply expanding polyurethane foam sealant along every drywall seam and around all drilled electrical holes.
- Plumbing Stacks and Ducts: Fill the annular spaces around PVC drain stacks and HVAC boots using expanding foam or elastomeric caulk paired with backer rod for wider gaps.
- Recessed Can Lights: Standard non-IC rated fixtures require a 3-inch clearance from all insulation to avoid fire hazards. Seal these by installing fire-rated, airtight covers over each fixture, foaming the cover perimeter to the ceiling drywall. If you have newer IC-rated airtight fixtures, seal the housing flange directly to the ceiling plane.
- Attic Access Hatches: The attic access panel is often a major source of air leakage. Apply adhesive weatherstripping around the perimeter stops, and fasten a 2- to 4-inch piece of rigid foam board to the top side of the hatch cover.
Attic Ventilation and Moisture Management
In a standard vented attic, airflow removes excess summer heat and carries away moisture that escapes from living areas below.
To preserve this pathway, install rigid polystyrene or cardboard rafter baffles (also known as insulation stops) at every rafter bay where the roof meets the exterior wall plates. These baffles preserve a clear 1- to 2-inch air channel above the insulation, directing intake air from the soffits up to the ridge vent without blowing loose insulation away from the perimeter. For homeowners utilizing rigid sheet options, this guide on DIY attic insulation using rigid foam boards covers useful detailing techniques.
Standard building practices require a balanced Net Free Ventilating Area (NFVA) ratio of 1:300 (or 1:150 if balanced intake and exhaust cannot be achieved), distributed evenly between high exhaust vents and low soffit intake vents.
Installation Strategies: Working with a Professional
While handy homeowners can roll out batts or rent a cellulose blower for basic floor retrofits, complex attic geometries, roof deck conversions, and spray foam applications require specialized commercial equipment.
Professional spray foam installers use high-pressure proportioner units, calibrated heated hoses, and dedicated personal protective equipment (including supplied-air respirators). Proper installation demands monitoring substrate moisture levels, ambient temperatures, and layer thickness to ensure clean chemical curing without off-gassing or adhesion failure.
When choosing a contractor, verify their licensing, general liability insurance, and certification with organizations like the Spray Polyurethane Foam Alliance (SPFA). You can use our directory to find qualified spray foam contractors who maintain high safety and installation standards.
Step-by-Step Professional Attic Space Insulation Process
A quality contractor follows a structured process to complete the job cleanly and safely:
- Pre-Installation Assessment and Safety Prep: Technicians inspect the attic for active leaks, wiring concerns, and structural defects. They set up temporary walking boards, install containment barriers over the home entrance, and run negative air machines if existing dust or fibers must be managed.
- Comprehensive Air Sealing: Crews air seal framing joints, penetrations, and light fixtures before applying the main insulation layer.
- Ventilation Protection: In vented assemblies, crews install rafter baffles in every eave bay and build sturdy dams around the attic hatch to contain loose-fill materials.
- Material Application: For blown-in materials, technicians verify target R-values using depth markers pinned throughout the space. For spray foam roof decks, installers apply the material in controlled passes to manage exothermic curing heat, achieving the specified thickness across all rafter bays.
- Quality Verification: The crew confirms uniform coverage, checks hatch weatherstripping, and reviews the finished project with the homeowner.
Financial Incentives, IRA Tax Credits, and Utility Rebates
Upgrading your attic insulation offers strong return on investment, with typical energy bill savings paying back the project cost within 2 to 5 years.
Under the federal Inflation Reduction Act (Section 25C Energy Efficient Home Improvement Credit), homeowners can claim a 30% tax credit on the cost of qualifying insulation and air-sealing materials, up to an annual limit of $1,200.
Additionally, many local electric and gas utilities offer cash-back rebates ranging from $0.15 to $0.50 per square foot for upgrading attic insulation from sub-standard levels to R-38 or higher. Combine these utility incentives with federal tax credits to offset a significant portion of your project cost.
Frequently Asked Questions About Attic Insulation
How do I calculate the target R-value for my attic?
Look up your home's IECC Climate Zone. For most homes across Virginia (Zone 4), the target performance level is between R-49 and R-60 for open attic floors, and R-30 to R-38 for unvented roof-deck spray foam assemblies. Divide your target R-value by the R-value per inch of your chosen material (for instance, cellulose provides roughly R-3.6 per inch, requiring approximately 14 to 16 inches of settled depth to achieve R-49 to R-60).
Can new insulation be installed over old attic insulation?
Yes, as long as the existing insulation is clean, dry, and free of mold or rodent damage. However, you should never place faced batts (batts with paper or foil vapor retarders) on top of existing insulation, as the facing will trap moisture inside the lower layer. Always use unfaced batts or blown-in loose fill for top-up layers, and air seal the attic floor before adding more material.
Why choose spray foam over traditional insulation materials?
Traditional fibrous insulation slows heat conduction, but it does not stop convective air leakage or seal irregular building assemblies. Spray foam creates an air-impermeable thermal barrier in a single step. It is especially useful for sealing roof decks, conditioning attics with HVAC ductwork, strengthening roof structures, and eliminating seasonal condensation risks.
Conclusion
A well-planned attic insulation upgrade lowers heating and cooling costs, protects your roof structure from moisture damage, and keeps your home comfortable year-round. Taking the time to air seal penetrations, choose high-performing materials, and balance ventilation paths ensures your thermal barrier delivers lasting performance.
At Sweet Home Spray Foam, we help homeowners throughout Virginia—including Richmond, Roanoke, Lynchburg, and Smith Mountain Lake—achieve quiet, comfortable, and energy-efficient homes. We take the guesswork out of thermal upgrades with clear upfront pricing, experienced installers, and expert guidance on local rebates and tax incentives. Contact us today to schedule your attic assessment and take the first step toward lasting comfort.