
Assessing Wall Suitability and Moisture Risks

To install DIY internal wall insulation, first verify the masonry is dry, then direct-bond or mechanically fix insulated plasterboards to the wall, and seal all joints with an airtight vapour control layer. Before buying materials or clearing furniture, you must determine whether your masonry is physically ready for an internal lining. In older solid brick and stone properties, walls manage water through continuous evaporation. Adding internal insulation lowers the temperature of the external masonry because indoor heat no longer warms the bricks, which slows drying times and increases the risk of moisture accumulation.
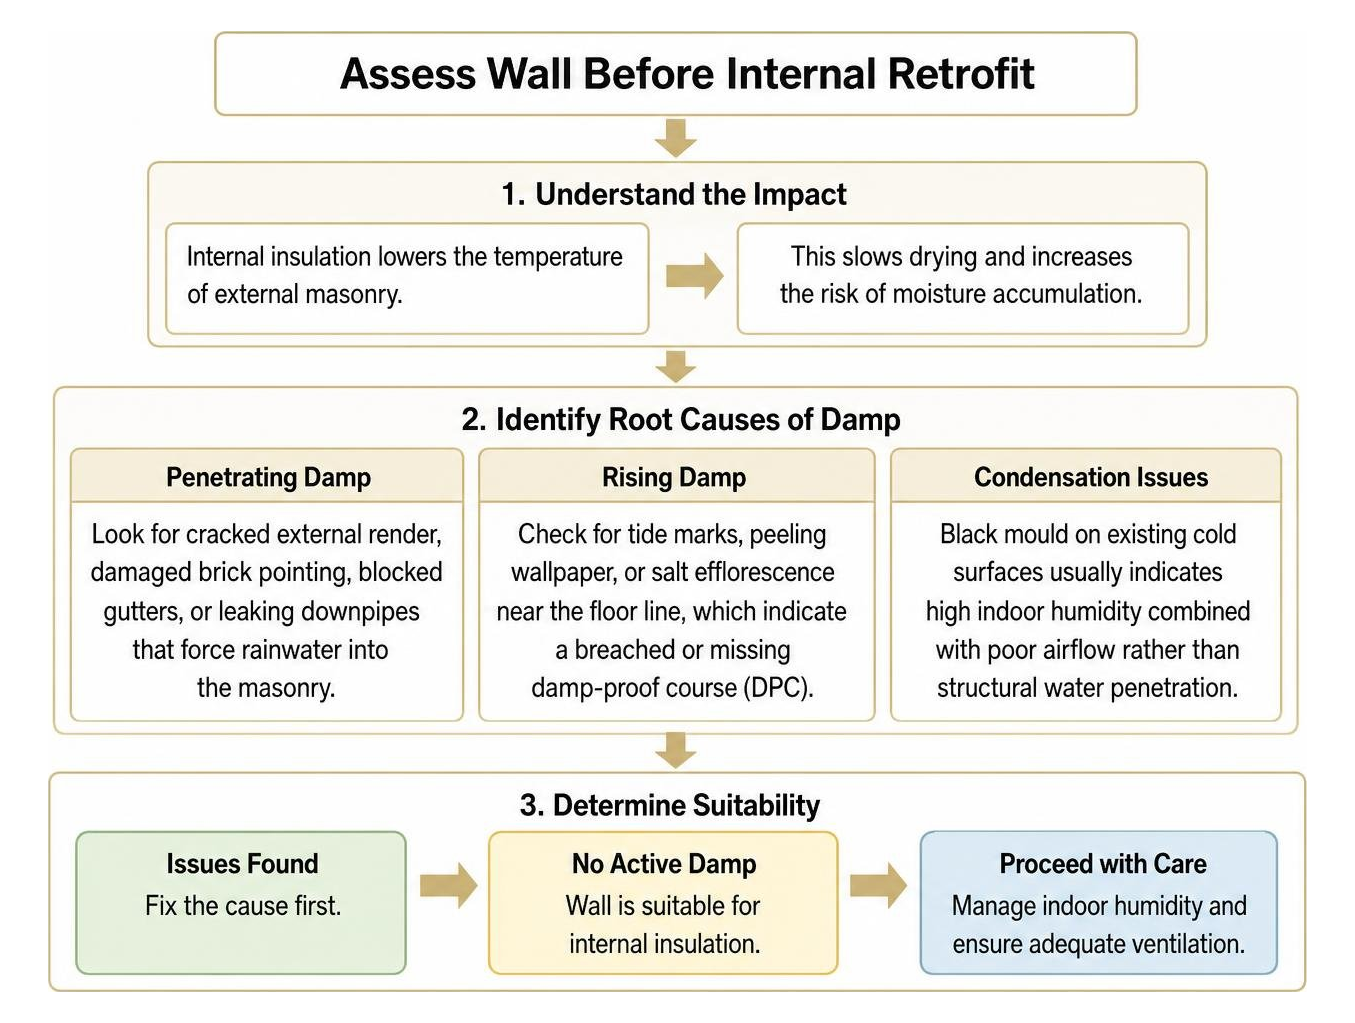
A pre-installation assessment starts with identifying the root causes of any visible damp:
- Penetrating damp: Look for cracked external render, damaged brick pointing, blocked gutters, or leaking downpipes that force rainwater directly into the masonry.
- Rising damp: Check for tide marks, peeling wallpaper, or salt efflorescence near the floor line, which indicate a breached or missing damp-proof course (DPC).
- Condensation issues: Black mould on existing cold surfaces usually indicates high indoor humidity combined with poor airflow rather than structural water penetration.
Never install insulation over an active moisture problem. Doing so seals water inside the brickwork, accelerating timber rot in embedded joist ends and degrading the wall structure.
To test for hidden moisture on seemingly dry plaster, conduct a 48-hour plastic sheet test. Tape a 500 mm × 500 mm square of clear polythene securely to the bare masonry using moisture-resistant tape, sealing all four edges. After two days, inspect the plastic:
- Droplets on the underside (facing the wall) indicate moisture evaporating from the masonry, meaning the wall must dry out and be repaired before proceeding.
- Droplets on the room side indicate excessive internal air humidity, which requires improved mechanical ventilation (such as continuous extract fans).
Consult the official Retrofit IWI government best practice guidance for detailed risk assessments regarding solid masonry substrates, exposure zones, and interstitial condensation modelling before altering traditional building envelopes.
Choosing the Best Materials for DIY Internal Wall Insulation
Selecting the right insulation board depends on your wall construction, available floor space, and whether your property requires a vapour-open (breathable) or vapour-closed system.
- Rigid Polyisocyanurate (PIR) Boards: Offering low thermal conductivity (around 0.022 W/mK), PIR provides strong thermal resistance per millimetre of thickness. It is rigid, lightweight, and easy to cut.
- Phenolic Foam Boards: Phenolic boards achieve thermal conductivity values as low as 0.018 W/mK, delivering high thermal efficiency where floor space loss must be minimised.
- Insulated Plasterboard (Thermal Laminate): These composite boards combine PIR or phenolic insulation pre-bonded to a 12.5 mm plasterboard sheet, incorporating an integral vapour control layer. They streamline the DIY process by allowing you to fix insulation and drywall in a single step.
- Woodfibre Insulation Panels: Made from compressed natural wood fibres, these boards are vapour-permeable and capillary-active. They absorb, store, and safely release moisture vapour, making them well-suited for historic or lime-built solid walls.
| Material Type | Typical Thermal Conductivity (W/mK) | Typical Thickness Required for U=0.30 W/m²K | Moisture Behaviour | Best DIY Use Case |
|---|---|---|---|---|
| Insulated Plasterboard (PIR) | 0.022 | 62.5 mm – 72.5 mm (total build-up) | Vapour-closed (integral VCL) | Straightforward solid brick walls; quickest single-step DIY fit |
| Rigid PIR Board | 0.022 | 50 mm – 70 mm (+ 12.5 mm plasterboard) | Vapour-closed (foil-faced) | Timber stud framing or direct masonry bonding with separate skim layer |
| Phenolic Foam Board | 0.018 | 40 mm – 60 mm (+ 12.5 mm plasterboard) | Vapour-closed | Tight spaces, narrow window reveals, and small rooms |
| Woodfibre Panels | 0.038 – 0.042 | 80 mm – 100 mm (+ breathable plaster) | Vapour-open (hygroscopic & breathable) | Heritage masonry, lime-rendered walls, and damp-sensitive stone |
Vapour Barriers and Breathable Wall Assemblies
Managing water vapour is essential when insulating solid walls from within. Warm indoor air carries moisture generated by cooking, bathing, and breathing. When this warm air penetrates insulation, it hits the cold masonry behind it, dropping below the dew point and condensing into liquid water—a phenomenon known as interstitial condensation.
Vapour-closed assemblies (using PIR, phenolic, or insulated plasterboards) rely on an unbroken vapour control layer (VCL) installed strictly on the warm (room-facing) side of the insulation. Every joint, perimeter edge, and screw penetration must be sealed with specialist airtightness tape rated to a minimum vapour resistance of 5,000 Pa.
For older solid walls built with lime mortars, breathable wood-wool carrier systems offer a hygrothermal buffering solution. These systems allow water vapour to move freely through the wall assembly without getting trapped behind impervious plastic layers. To explore how different insulation mechanisms manage thermal boundaries and airflow, read our guide on traditional vs spray foam insulation.
Planning and Budgeting Your Wall Retrofit
Every millimetre of insulation added to an external wall reduces usable interior floor space. A standard insulated plasterboard system typically adds 65 mm to 90 mm to the wall depth once adhesive and skim coats are factored in. Across an average 4 m × 4 m room, insulating two external walls reduces the overall floor area by approximately 0.4 m² to 0.6 m².
Under UK Building Regulations (Approved Document Part L), renovating more than 50% of an external thermal element, or more than 25% of the total building envelope, is notifiable work. The regulations set a target U-value of 0.30 W/m²K for retrofitted external solid walls (improving on uninsulated solid brick walls, which sit around 2.1 W/m²K). If reaching 0.30 W/m²K causes technical issues or reduces room floor area by more than 5%, Building Control allows an adjusted target based on technical feasibility.
Homeowners exploring grant schemes should note that while the Great British Insulation Scheme (GBIS) concluded in early 2026, the ECO4 scheme continues to support whole-house retrofits for qualifying low-income households.
Estimating DIY Internal Wall Insulation Costs vs Professional Retrofits
Carrying out internal wall insulation yourself reduces labour costs, though it requires an investment in tools, fixing anchors, sealants, and waste disposal.
- DIY Material Costs: Typically run between £70 and £100 per m² for high-performance insulated plasterboard, mechanical fixings, adhesive, airtight tapes, and finishing plaster.
- Professional Contractor Costs: Typically range from £140 to £220 per m², bringing a standard semi-detached retrofit (approx. 45 m² across three exposed external walls) to £8,000–£10,000.
- Total DIY Outlay: Insulating that same 45 m² area on a DIY basis costs roughly £3,500 to £4,500 in materials and tool hire.
- Energy Bill Savings: Upgrading uninsulated solid walls saves an estimated £350 to £500 per year on space heating costs for a typical gas-heated semi-detached home.
- Payback Period: DIY installations typically reach break-even in 10 to 15 years, whereas full-price professional installations can take 20 to 30 years without grant subsidies. Over a 25-year period, cumulative heating bill savings can exceed £8,750.
For deeper technical breakdowns on managing home energy efficiency and thermal envelope planning, explore our comprehensive insulation education resources.
Critical Installation Steps and Detailing
Achieving high thermal performance requires careful attention to detail during installation. Leaving even small gaps behind boards allows warm room air to circulate behind the insulation, leading to heat loss and condensation.
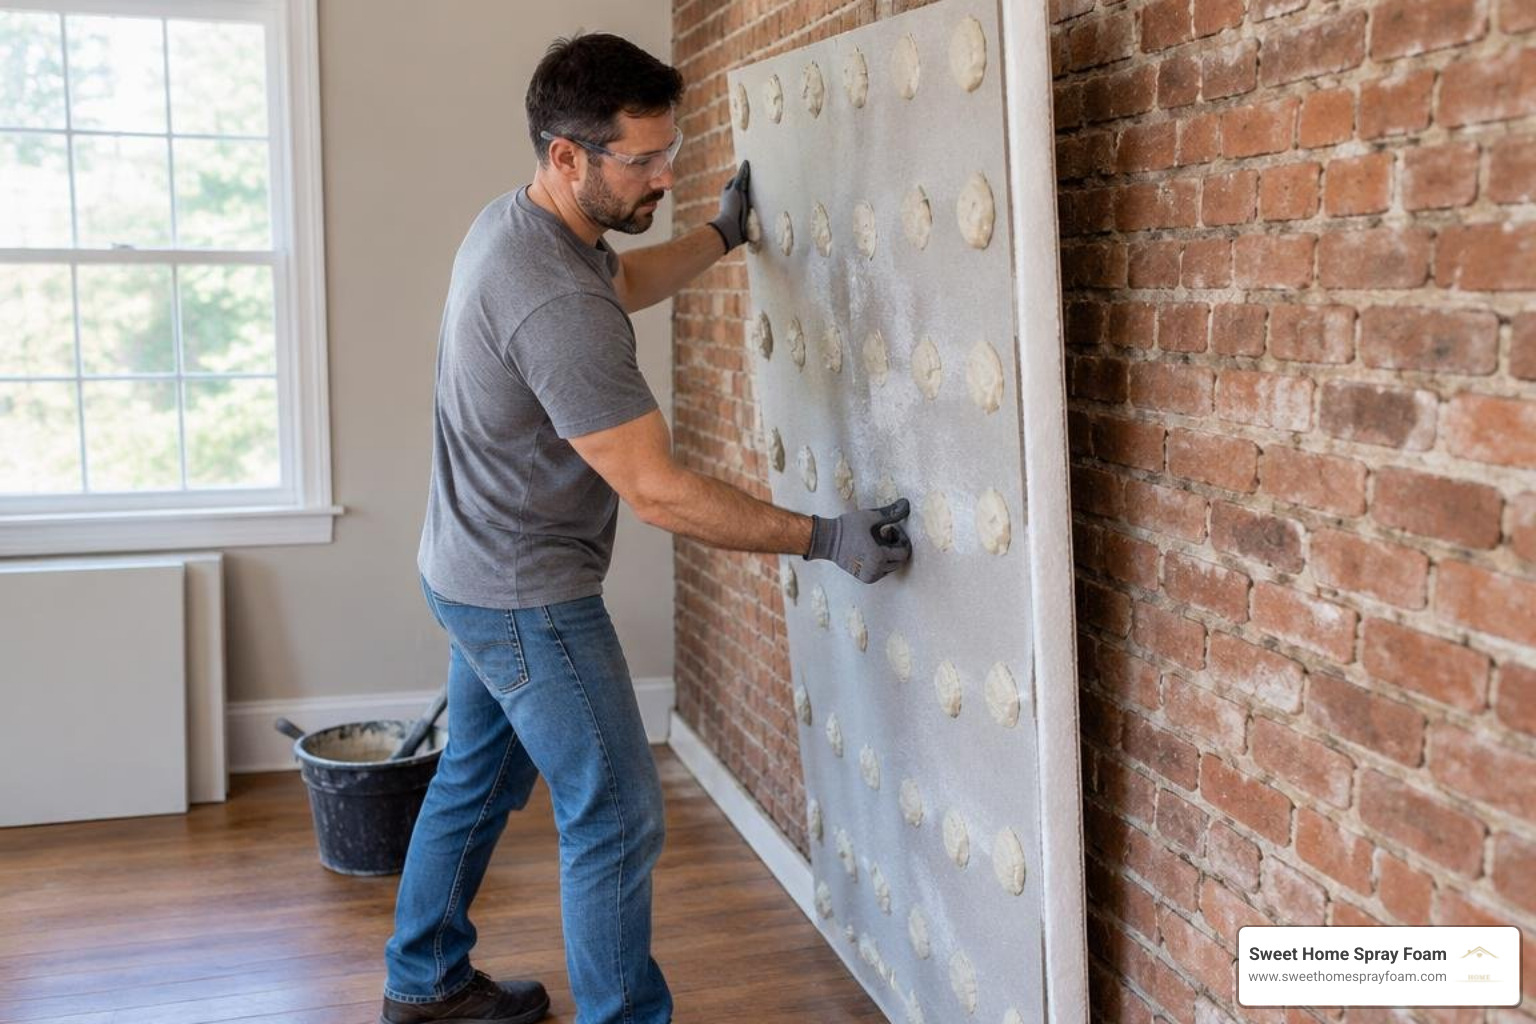
Step-by-Step DIY Internal Wall Insulation Installation
Follow this practical sequence to install direct-bonded insulated plasterboard on sound masonry:
- Substrate Preparation: Strip all wallpaper, gloss paint, and loose or hollow plaster back to sound masonry or stable base plaster. Treat any minor pointing defects and vacuum away dust.
- Apply Adhesive Dabs: Mix plasterboard adhesive (drywall adhesive) to a thick consistency. Apply continuous ribbons of adhesive around the perimeter of each board location, as well as around window openings and ceiling/floor junctions, to create a solid fire-break and air barrier. Apply secondary dabs across the board centre at regular intervals.
- Position and Level Boards: Press the insulated plasterboard firmly against the wall, using a 2-metre spirit level to ensure the face is plumb and flat. Leave a 10 mm expansion gap at the base floor line (to prevent moisture wicking from the subfloor).
- Install Mechanical Fixings: Once the adhesive sets (usually 2 to 4 hours), drill through the board into the masonry substrate. Insert thermally broken, all-metal or composite insulation anchors at a minimum rate of 5 fixings per square metre (typically 2 fixings per board placed 15 mm from the edge and 1 in the centre).
- Airtight Vapour Sealing: Fill the 10 mm bottom expansion gap with low-expansion polyurethane foam. Seal all board-to-board joints, ceiling junctions, and internal corners with high-adhesion vapour-sealing tape rated to 5,000 Pa vapour resistance.
- Surface Finishing: Apply scrim tape over all tapered board joints, then apply a 2 mm skim finish coat of multi-finish plaster, or tape and joint the drywall for painting.
For complex wall geometries, hard-to-reach crawlspaces, or scenarios where direct bonding is impractical, applying high-performance wall spray foam insulation provides an airtight, seamless alternative that eliminates the need for manual board scribing.
Eliminating Thermal Bridges Around Windows and Sockets
A thermal bridge occurs wherever a gap in the insulation creates a fast track for heat to escape through the wall structure. These localised cold spots attract condensation, leading to mould growth behind skirting boards and around window frames.
- Window and Door Reveals: Never stop insulation flush with the corner of an external window opening. Strip existing plaster from the window reveal and apply a slim 20 mm to 25 mm high-performance PIR or phenolic strip along the reveal face, butting it tightly against the window frame.
- Electrical Sockets and Switches: Never cut large holes into the insulation board to recess standard metal backboxes against the cold brickwork. Instead, mount surface-mounted patress boxes directly onto the face of the new plasterboard, or install insulated cavity drywall boxes within a shallow service void framed over the vapour control layer.
- Floor and Ceiling Junctions: Lift the floorboards adjoining the external wall and insulate the timber joist ends. Ensure cold draughts from unconditioned subfloors cannot travel up behind the new insulation panels.
Frequently Asked Questions About Internal Wall Insulation
Do I need building regulations approval to install internal wall insulation?
Yes. In the UK, installing internal wall insulation across more than 50% of an individual room's external wall area or 25% of the total building envelope is classified as a substantial renovation of a thermal element under Building Regulations Part L. You must submit a Building Notice to your Local Authority Building Control (LABC) before starting work, or carry out the installation under an accredited competent person scheme. This ensures your installation meets fire safety standards (Part B), ventilation requirements (Part F), and target U-values (Part L), which helps protect your property value and keeps your Energy Performance Certificate (EPC) accurate.
How much floor space will I lose with internal insulation?
The total depth lost typically ranges from 60 mm to 100 mm per insulated wall, depending on the material chosen and fixing method used. A standard 62.5 mm insulated plasterboard (50 mm PIR core + 12.5 mm plasterboard) fixed with a 10 mm adhesive bed and 2 mm skim coat reduces room depth by approximately 75 mm. In an average room measuring 4 m × 3 m with two external walls, this equates to losing roughly 0.45 m² of usable floor area. Using higher-efficiency phenolic boards can reduce this lost depth to 50–60 mm total.
What is the most common mistake with DIY internal wall insulation?
The most common and costly mistake is insulating over undetected damp or failing to install a continuous, airtight vapour control layer (VCL). When an installer skips the pre-installation damp check or leaves unsealed gaps around socket penetrations, warm internal air bypasses the insulation and condenses against the cold masonry. This can cause interstitial condensation, leading to hidden timber decay, mould blooms, and up to a 50% reduction in thermal efficiency. Always resolve structural moisture issues first and tape every joint thoroughly.
Conclusion: Transforming Cold Walls into Energy-Efficient Spaces
Retrofitting solid masonry walls is one of the most effective ways to lower household energy demand and eliminate draughts from older properties. While the project requires methodical planning, moisture testing, and careful detailing around thermal bridges, completing the work on a DIY basis can save thousands of pounds compared to professional contractor rates while delivering a warmer, more comfortable home.
If your property features hard-to-access cavities, complex wall framing, or uneven stone masonry that makes rigid board installation difficult, professional insulation methods can provide a seamless, high-performance thermal boundary. Contact Sweet Home Spray Foam for expert home insulation and energy efficiency solutions tailored to your home's structural requirements.